Exposure Management
Classification Rules
Classification Rules is where an administrator configures two related, but separate, classification systems: the asset categories (such as Windows Server, Linux, or Network Devices) that power filter tabs across the product, and the finding layers (Operating System vs. Application) that describe what kind of thing a vulnerability was found in. It also has a review queue for findings the rules couldn't confidently classify, and an audit log of every change.
What it's for
- Control the system-type filter tabs: the All Systems / Windows Server / Linux / Network-style filter chips you see on Assets, Vulnerabilities, and dashboard views come from the rules configured here.
- Classify findings as OS or Application: decide which scanner checks represent operating-system issues versus application issues, so you can filter and report on them separately.
- Clean up anything ambiguous: review findings the rules left unclassified or in conflict, and either fix the rule or set a manual override.
- See who changed what: every rule change, override, and reclassification run is recorded.
The screens in it
Classification Rules is a single page with four tabs across the top.
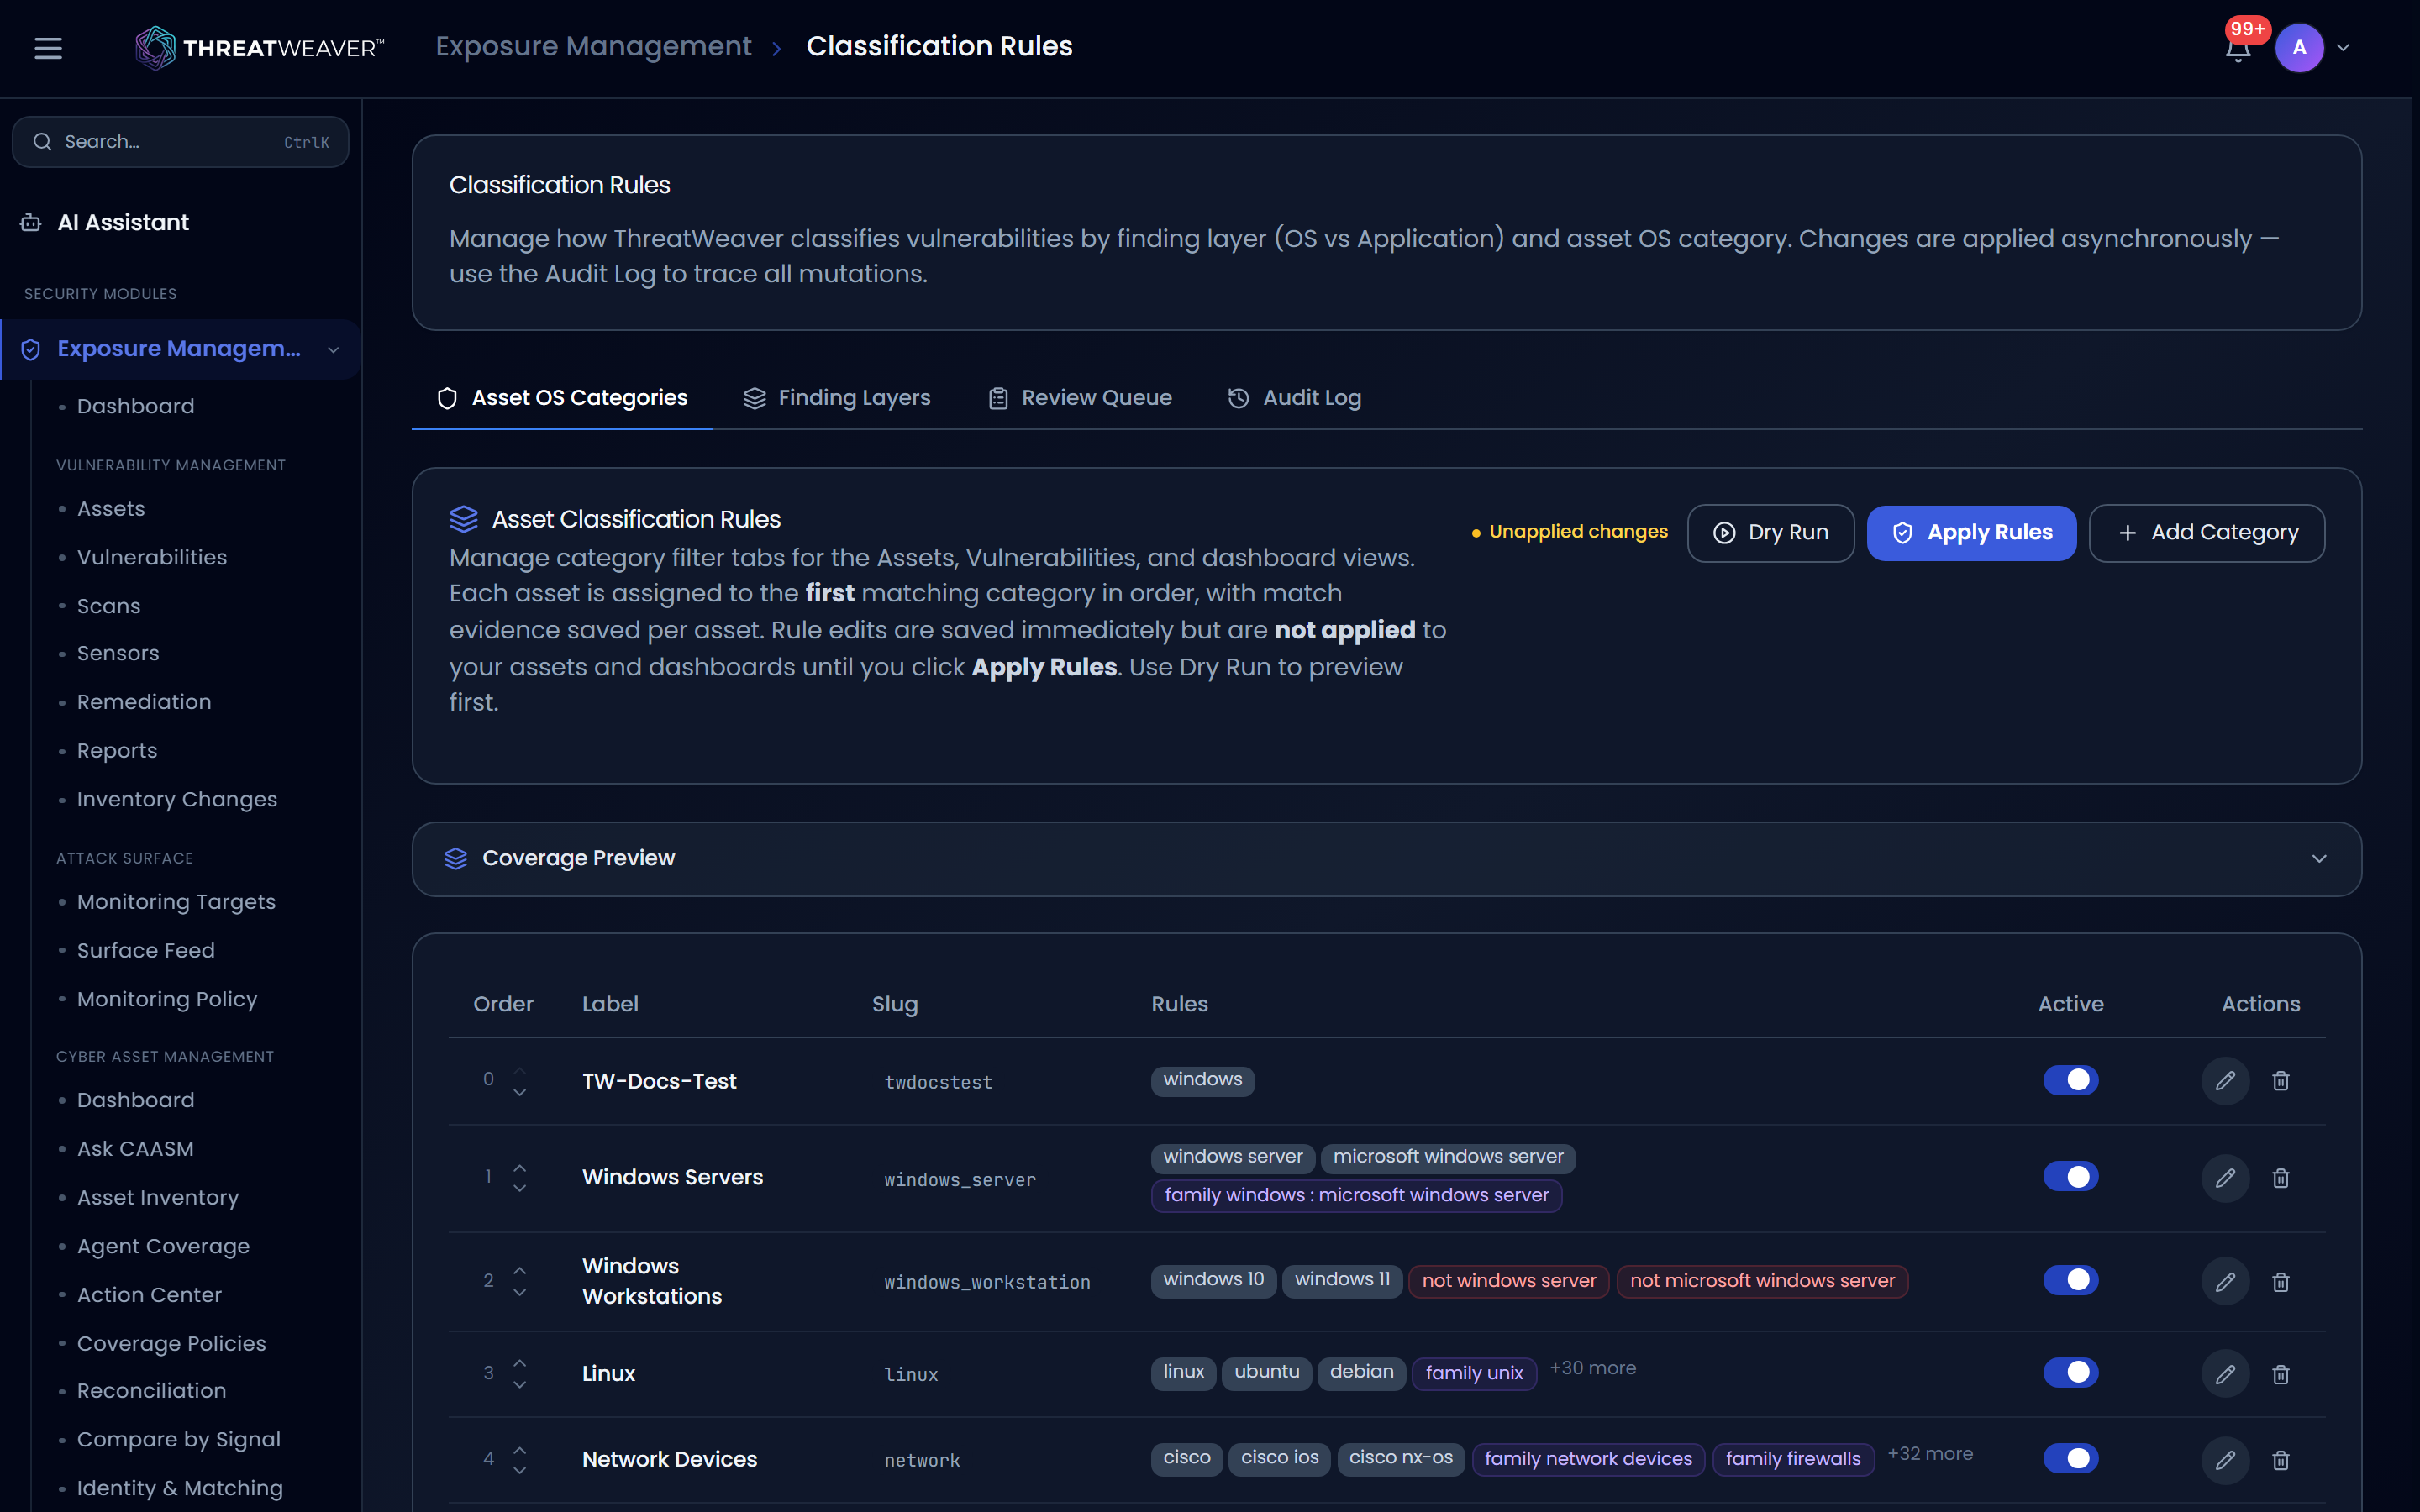
- Asset OS Categories: the rules that sort each asset into a system-type category.
- Finding Layers: the rules that sort each finding into Operating System, Application, or Unclassified.
- Review Queue: findings the Finding Layers rules couldn't confidently place, with manual and AI-assisted tools to resolve them.
- Audit Log: a record of every classification change.
On Finding Layers, Review Queue, and Audit Log, only an administrator can make changes; anyone who can open the page can view it, but the buttons to create, edit, delete, reorder, or override only appear for an administrator.
Unlike the other three tabs, Asset OS Categories shows its Add, Edit, Delete, reorder, and Apply Rules controls to every viewer, regardless of role. A non-administrator who clicks one of them will have the action rejected rather than have the button hidden in the first place.
Asset OS Categories
Each asset is checked against your categories in order, and lands in the first one it matches. The result is what powers the category filter tabs you see elsewhere in ThreatWeaver.
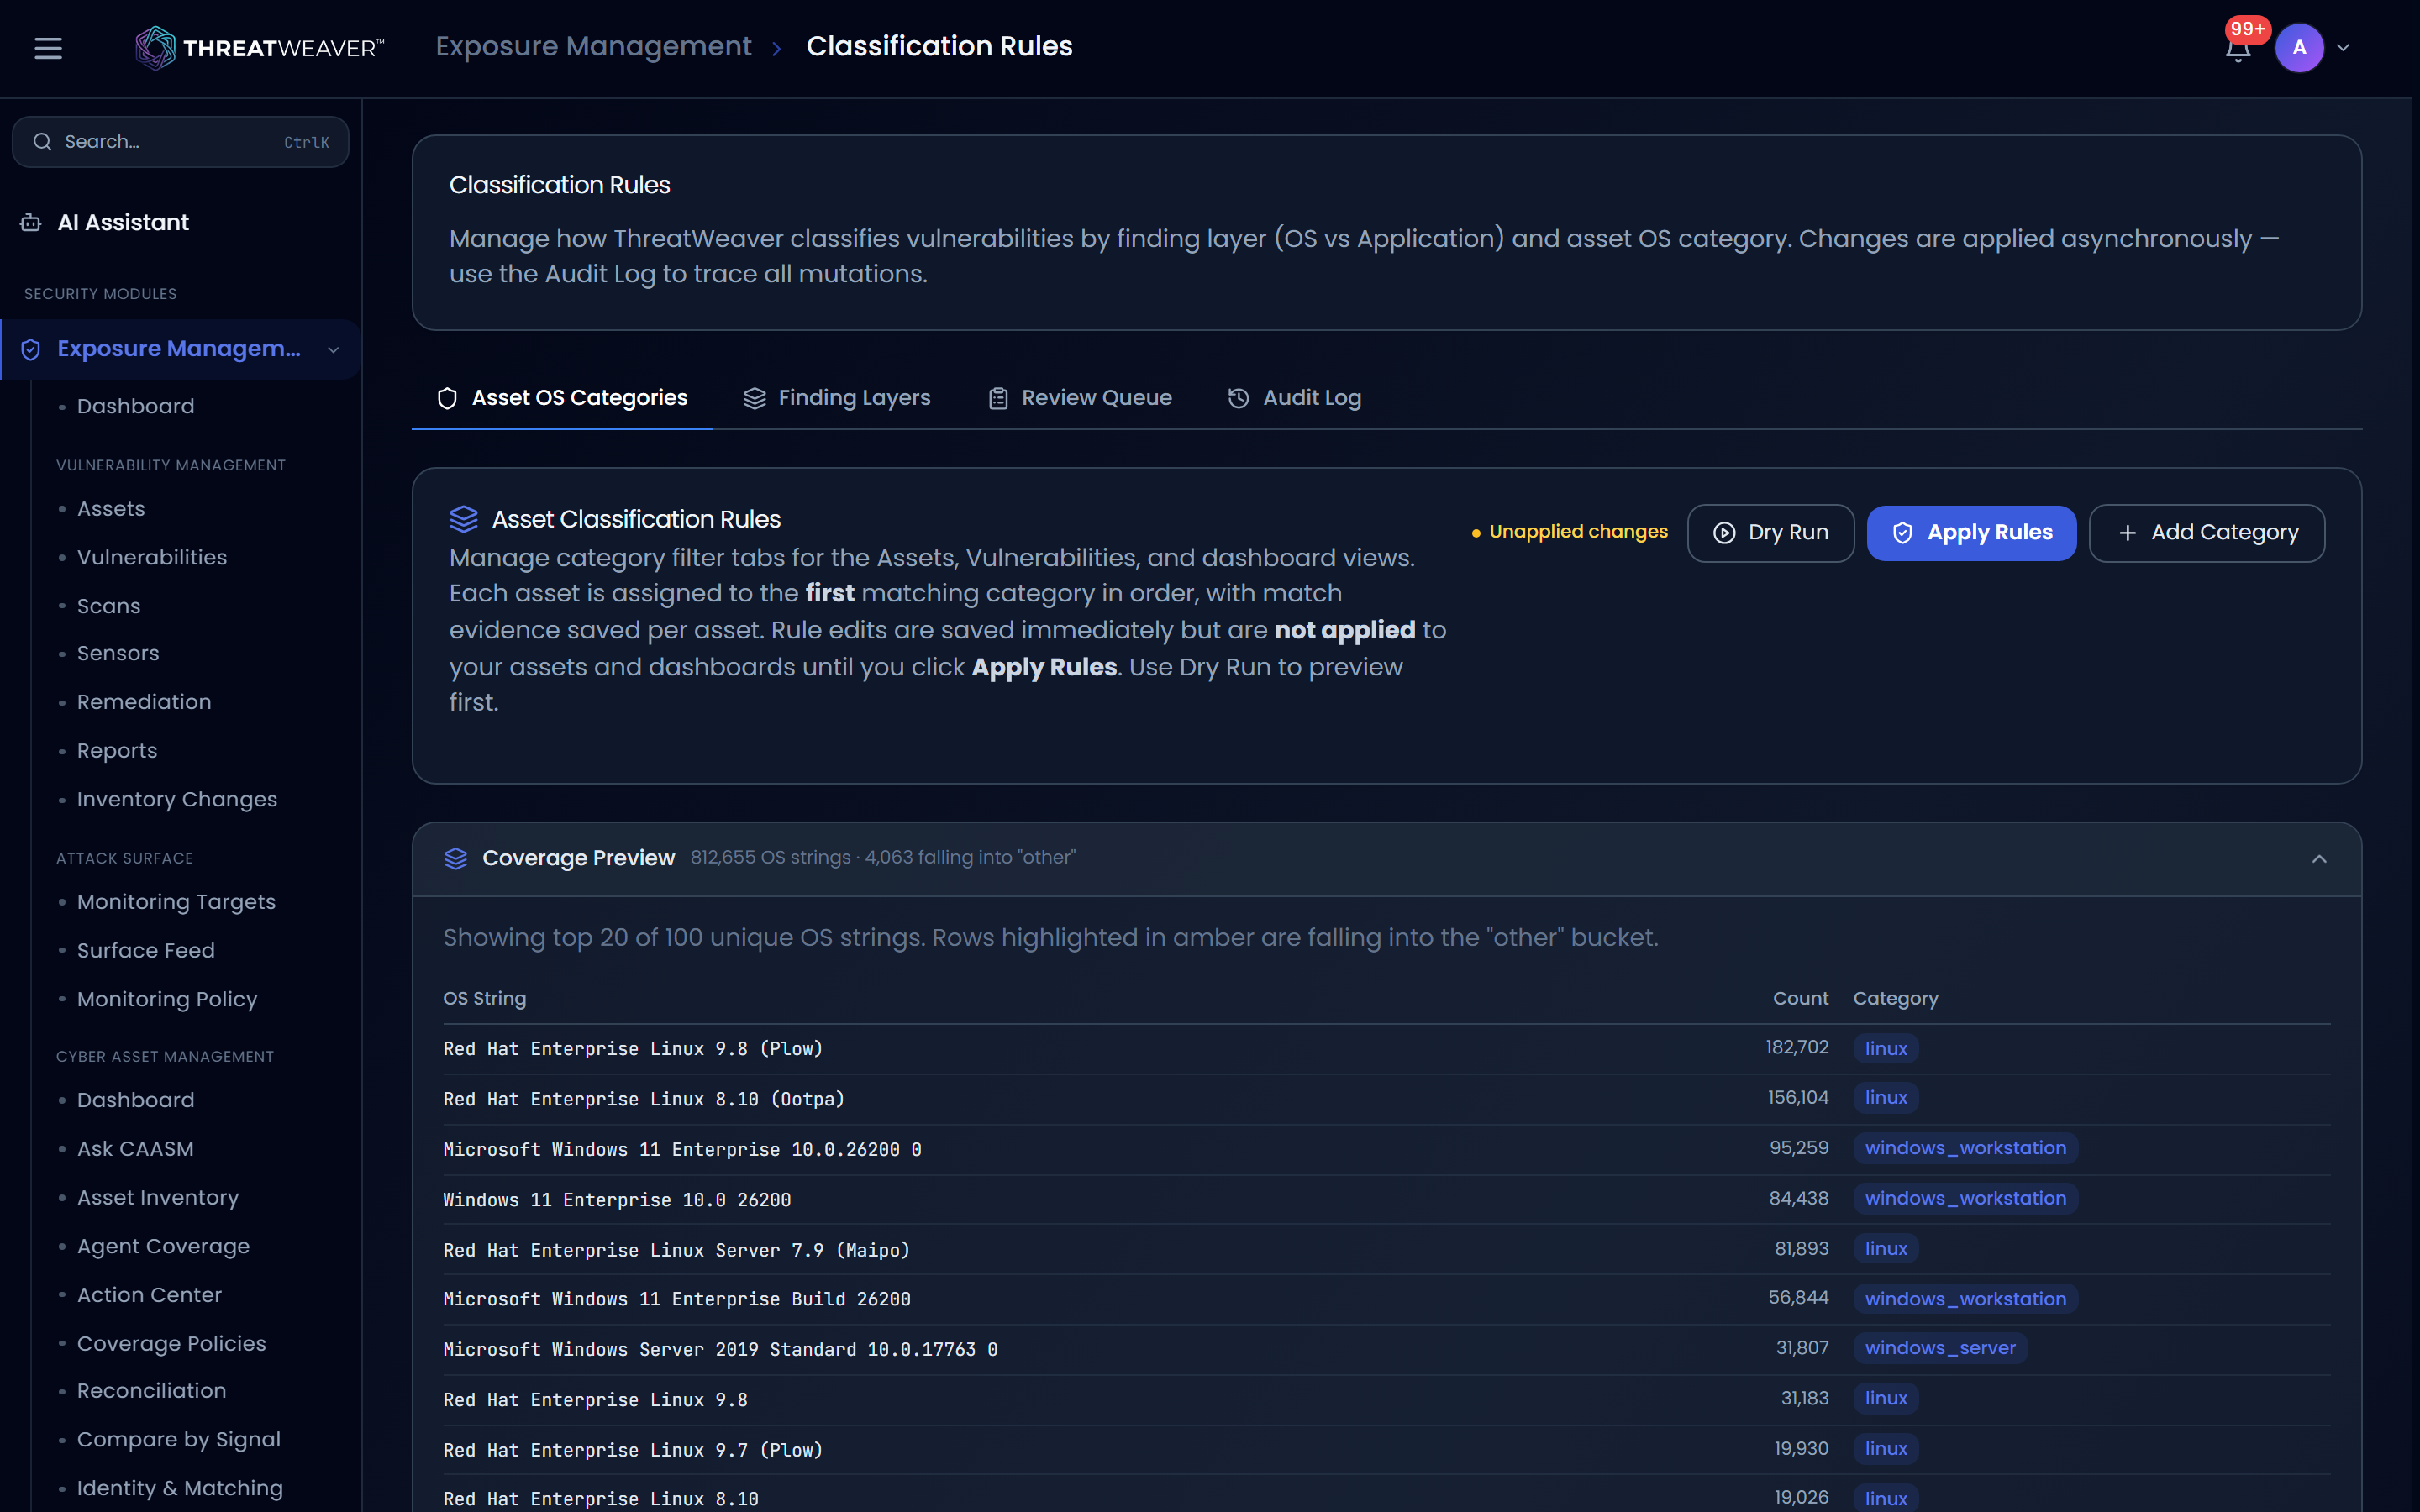
ThreatWeaver ships with five starting categories: Windows Servers, Windows Workstations, Linux, Network Devices, and a catch-all Other, but these aren't locked. You can edit, reorder, deactivate, or delete any of them exactly like a category you create yourself.
Controls
| Control | What it does |
|---|---|
| Add Category | Opens the category editor to create a new one. |
| Dry Run | Previews the effect of your current rules (how many assets would change category, and where) without saving anything. |
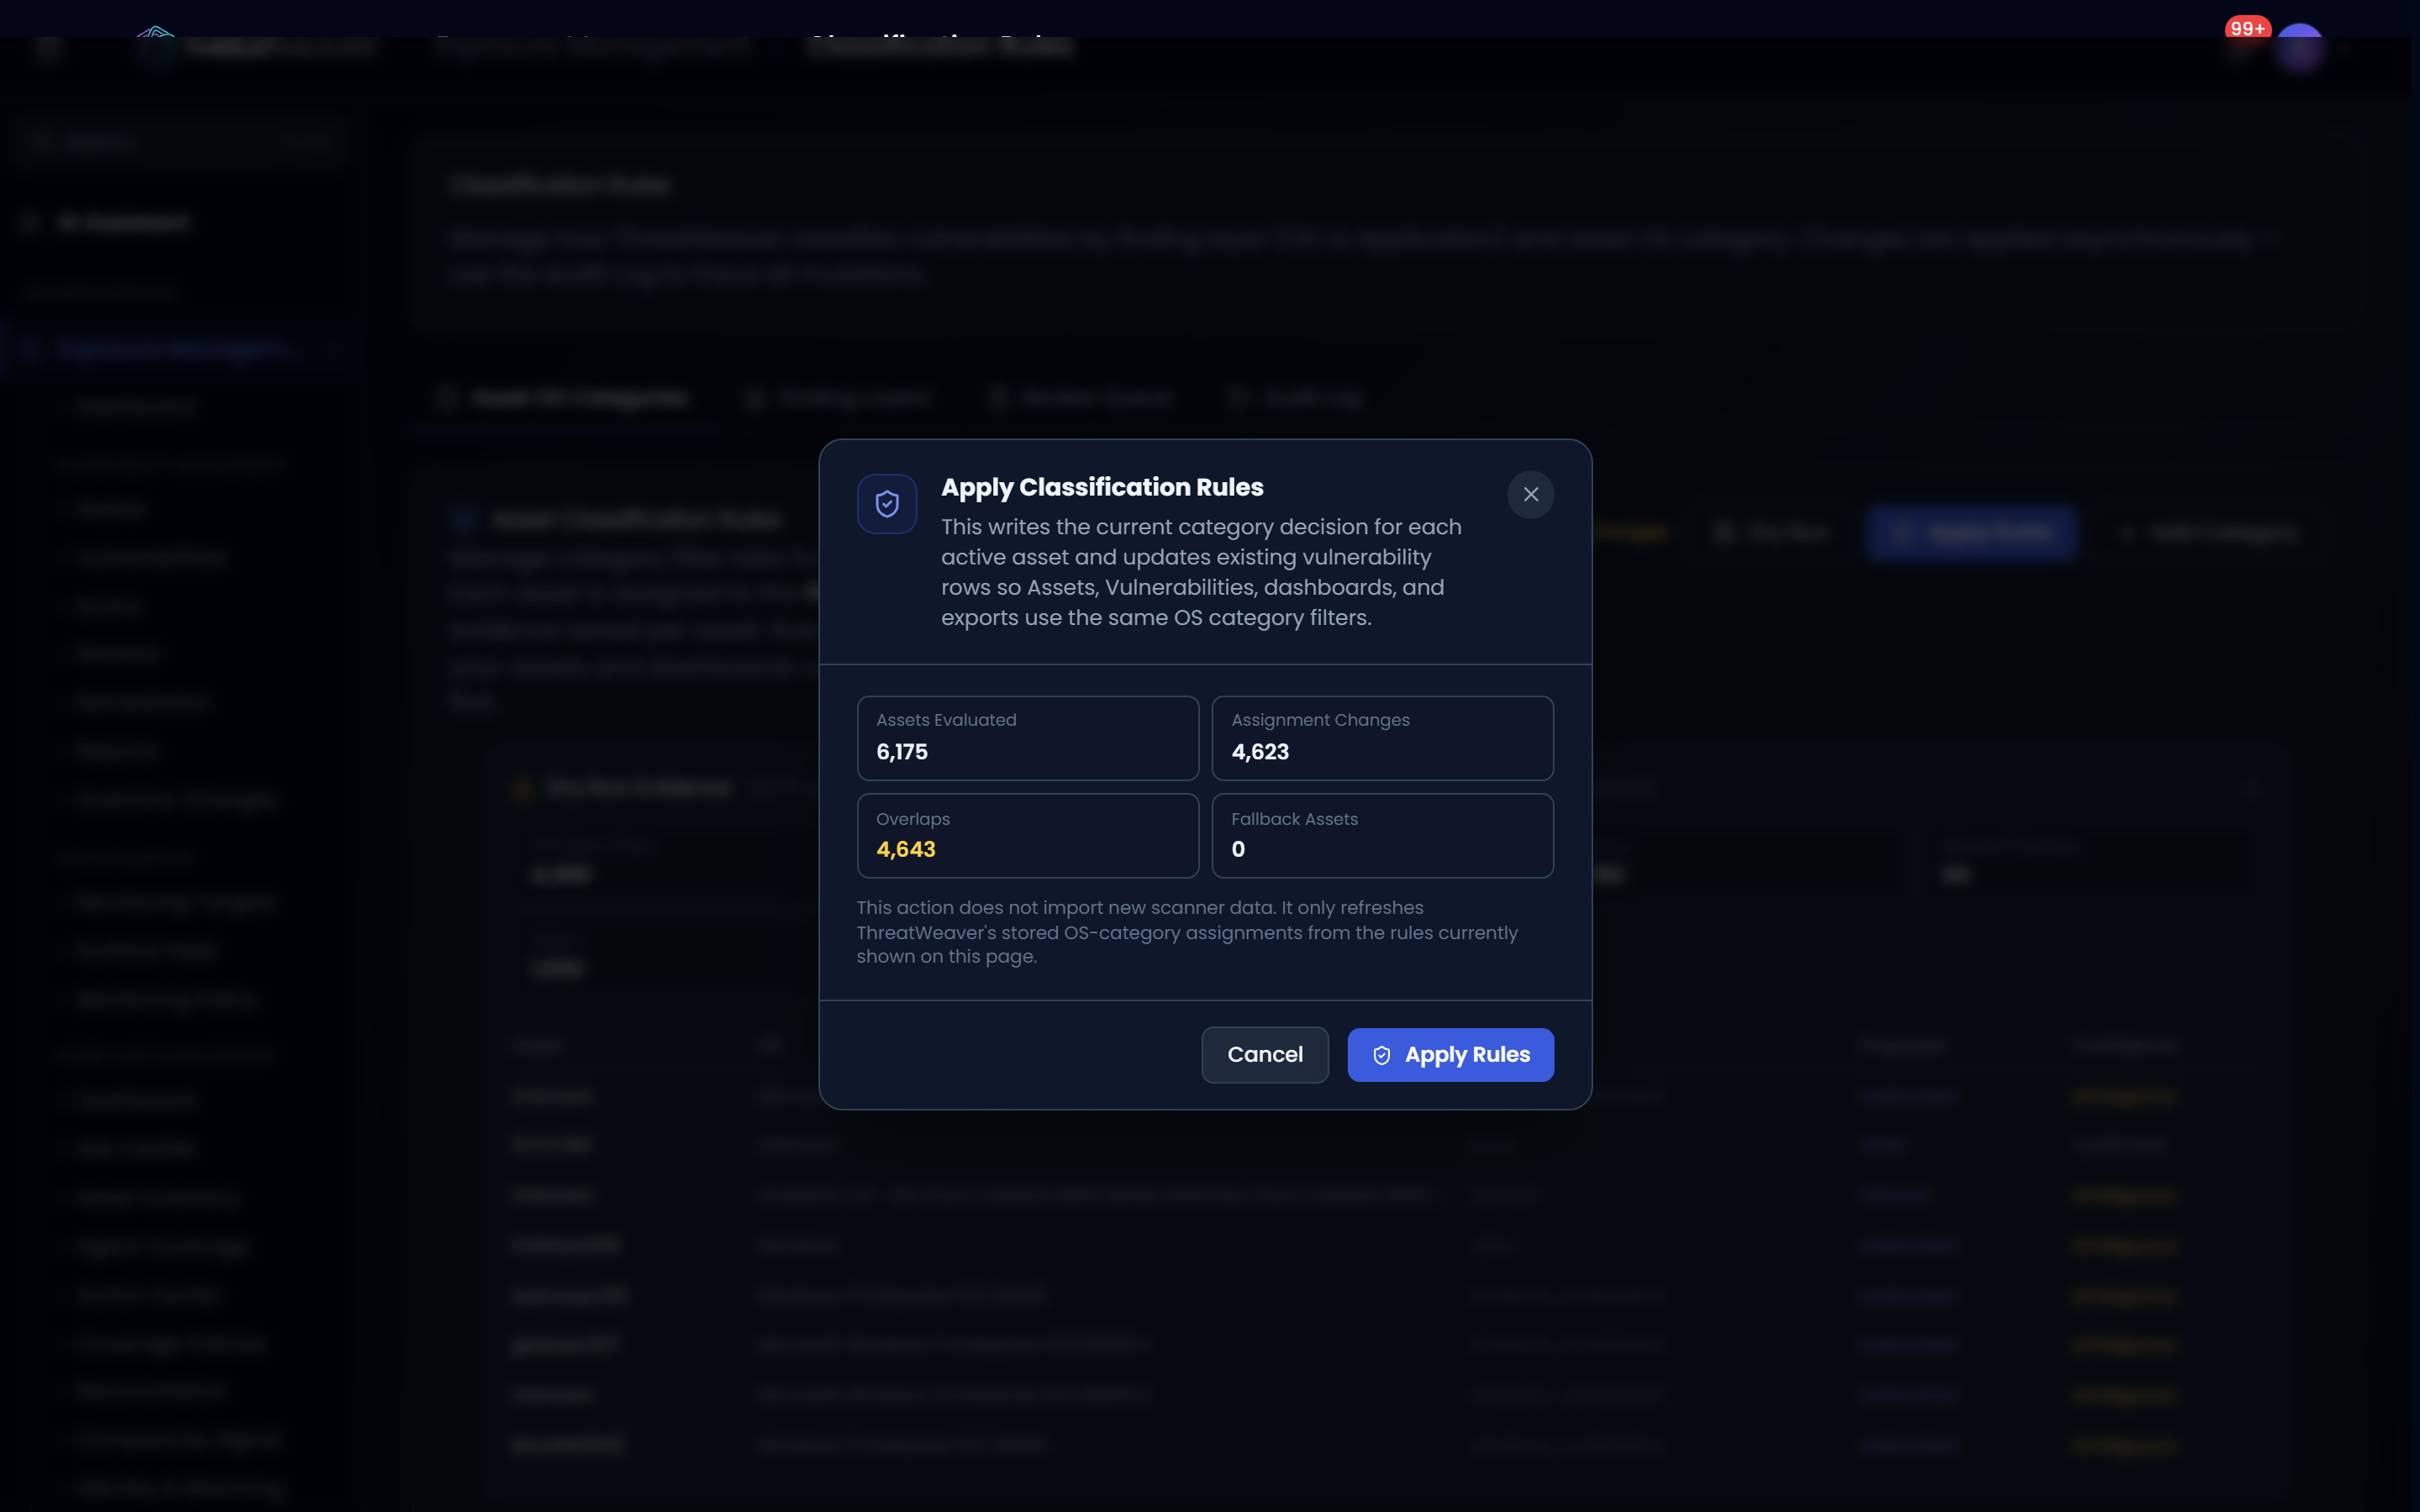
| Apply Rules | Writes the current rule set to your assets. Shows a confirmation with the Dry Run numbers if you've already run one. |
| Order (↑ / ↓) | Moves a category up or down. Order matters: the first matching category wins. |
| Active toggle | Turns a category on or off. Inactive categories are skipped during classification. |
| Edit (pencil) | Opens the category editor with its current settings. |
| Delete (trash) | Removes the category, after a confirmation. |
| Coverage Preview | An expandable panel listing every OS description ThreatWeaver has seen and which category it currently falls into. Rows landing in "Other" are highlighted so you can spot gaps. |
Creating, editing, deleting, reordering, or toggling a category saves immediately, but existing assets keep their current category until you click Apply Rules. Run Dry Run first to see the impact, then Apply Rules to push the new assignments. Applying rules only refreshes ThreatWeaver's stored categories; it doesn't pull new data from your scanners.
The category editor
| Field | What it does |
|---|---|
| Label | The category's display name. Its internal identifier is generated automatically the first time you save and can't be changed afterward. |
| OS Name Keywords | Words or phrases that must appear in the asset's reported OS description for it to match (for example, "windows server"). |
| OS Exclude Keywords | Words that disqualify an otherwise-matching asset. |
| Plugin Family Keywords | An additional match signal based on the scanner's check family. |
| Network & Host Matchers | Paste IP addresses, CIDR ranges, IP ranges, hostnames, or FQDNs (one per line, or separated by commas) to match assets by network identity instead of, or in addition to, their OS description. |
| Advanced Conditions | Build more specific rules from a field (OS, hostname, IP, source, tags, asset type, business criticality, and more) and an operator (contains, equals, is one of, matches pattern, inside a CIDR/range, seen within N days, exists, and others). |
| Show as filter on | Three checkboxes (Dashboard, Assets, Vulnerabilities) that control only where this category's filter chip appears. They don't change which assets match. |
| Active | Whether this category takes part in classification at all. |
As you edit criteria, a live preview shows how many assets and vulnerabilities currently match, with a button to download the matching assets as a CSV. A category needs at least one active matching rule (a keyword, matcher, or advanced condition) unless it's inactive or is the catch-all category.
Finding Layers
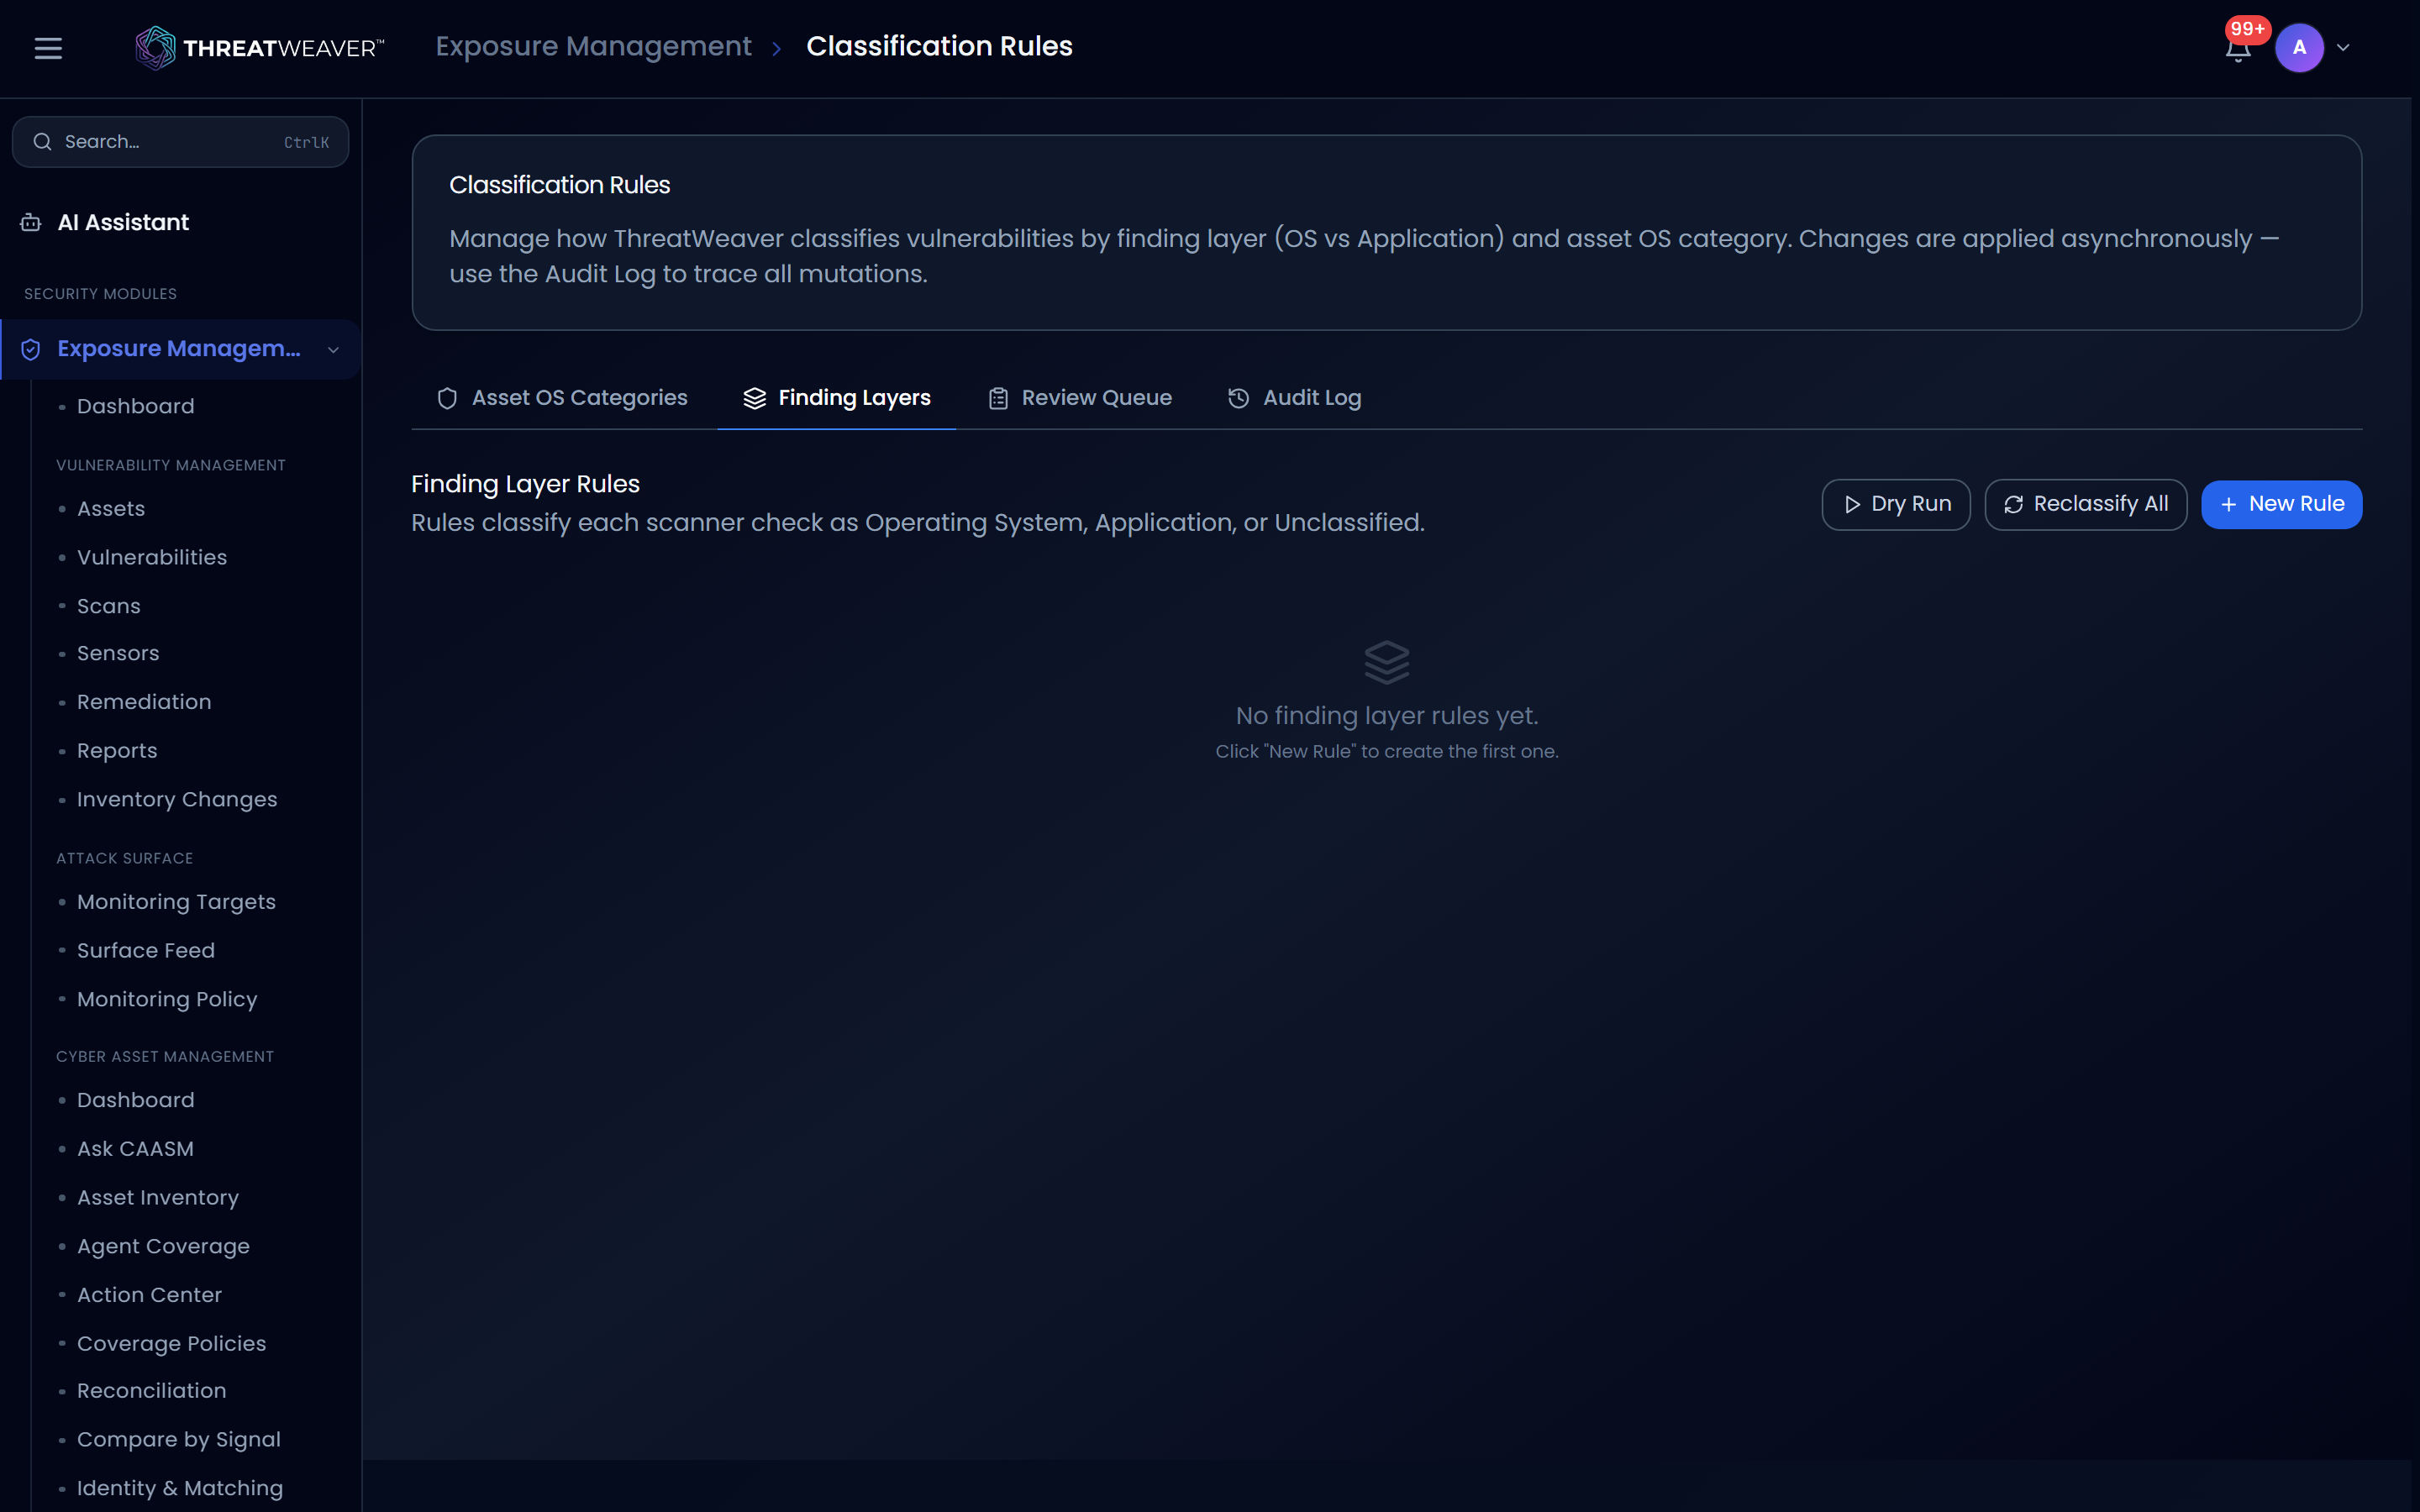
Separately from asset categories, Finding Layers classifies individual findings as Operating System, Application, or Unclassified, so you can filter and report on OS-level issues separately from application-level ones.
Controls
| Control | What it does |
|---|---|
| New Rule | Opens the rule editor to create a rule. |
| Dry Run | Previews how many findings would change layer, become unclassified, or keep a manual override, without saving. |
| Reclassify All | Queues a full reclassification of every finding in your workspace. |
| Order (↑ / ↓) | Moves a rule up or down; the first matching rule wins. |
| Edit / Delete | Edit a rule's settings, or delete it (a reason is required). |
Rules that shipped with your workspace are marked with a small default label, but they aren't locked: you can edit or delete them like any other rule.
Unlike Asset OS Categories, creating, editing, deleting, or reordering a Finding Layer rule immediately queues a reclassification job: there's no separate "Apply" step. A progress banner tracks the job while it runs.
The rule editor
| Field | What it does |
|---|---|
| Label | The rule's name. |
| Resolver | The signal the rule checks: product taxonomy, scanner category, plugin or check name, CPE, scanner metadata, or a manual assignment. |
| Target Layer | What matching findings are assigned: Operating System, Application, or Unclassified. |
| Match Conditions | Any number of field/operator/value rules (source scanner, check ID or title, plugin family, scanner category, product or vendor name, package name, advisory ID, or CPE parts) using exact match, contains, starts with, ends with, or a regular expression. A rule with no conditions matches everything within its resolver. |
| Active | Whether the rule takes part in classification. |
Review Queue
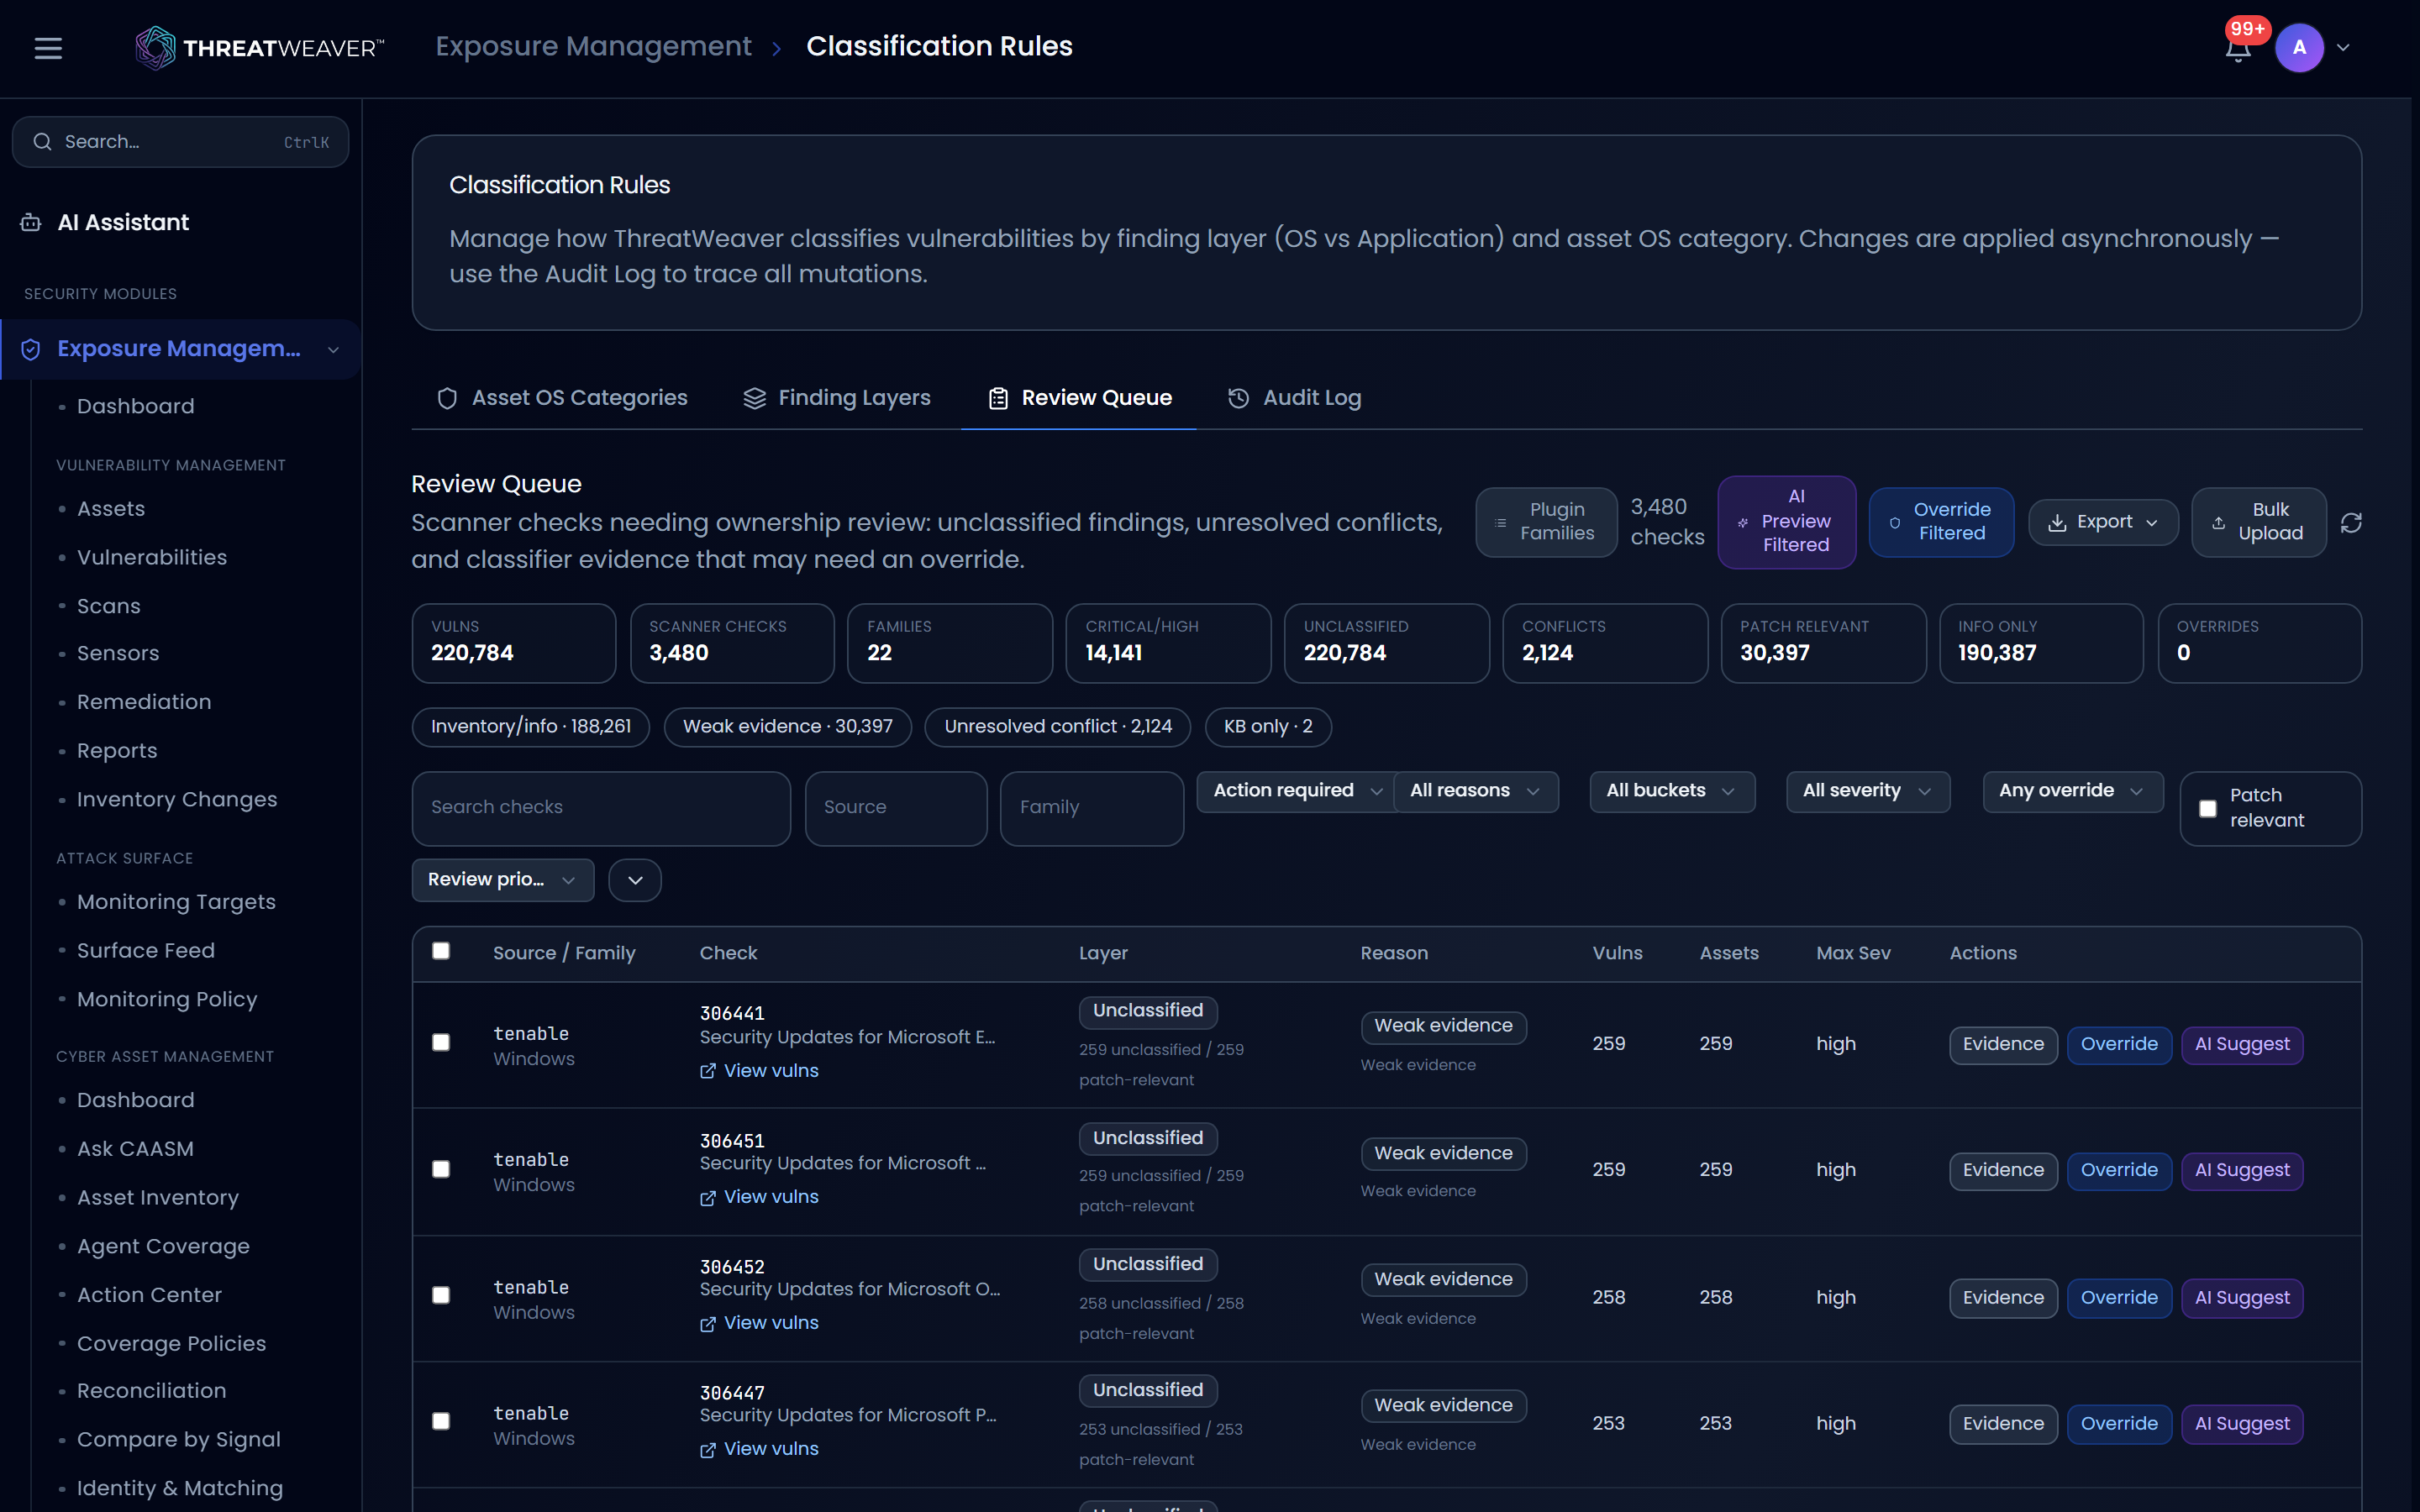
Findings the Finding Layers rules left unclassified or flagged as a conflict land here for manual review.
Filtering and grouping
| Control | What it does |
|---|---|
| Search | Finds checks by ID, title, plugin family, or scanner category, not by reason text. |
| Source / Family | Narrows to a scanner source or plugin family. |
| Layer | Action required (the default), Unclassified, or All conflicts. Action required currently shows the same items as Unclassified. |
| Reason | Two separate filters: one for the specific reason code (for example weak evidence, mixed CPE, ambiguous product), and a broader "bucket" filter that groups reasons together (for example inventory/info, unresolved conflict, missing evidence). |
| Severity | Filters by the finding's severity. |
| Override status | Filters by whether an item already has a manual override. |
| Patch relevant | Limits to checks that have a known fix available. |
| Sort by | Orders the list by review priority, vulnerability count, severity, last seen, or family, ascending or descending. |
| Group by Plugin Families | Collapses the list into one row per plugin family, with a link to drill into its individual checks. |
Row actions
| Control | What it does |
|---|---|
| Evidence | Expands the signals the classifier used to make (or fail to make) a decision. |
| Override | Sets a manual layer for this check, with a required reason. |
| AI Suggest | Generates a recommended layer with a confidence score and reasoning, which you can apply with one click. |
| Clear | Removes an existing manual override. |
| View vulns | Jumps to the Vulnerabilities list, filtered to this check. |
Bulk actions
Select rows with the checkboxes (or use Override Filtered / AI Preview Filtered to act on everything matching your current filters, up to 1,000 checks at a time) to override or AI-preview several checks at once. Export downloads the current filtered queue as CSV, Excel, or JSON. Bulk Upload lets you submit a CSV of manual overrides (source, check, layer, and reason columns) after previewing it in the browser.
Audit Log
A read-only, timestamped history of every rule created, updated, deleted, or reordered; every override set, cleared, or bulk-set; and every reclassification run started, completed, or failed, each showing who made the change. Filter by event type and expand a row for full detail.
Common workflows
Workflow: add a custom asset category
- Open Asset OS Categories and click Add Category.
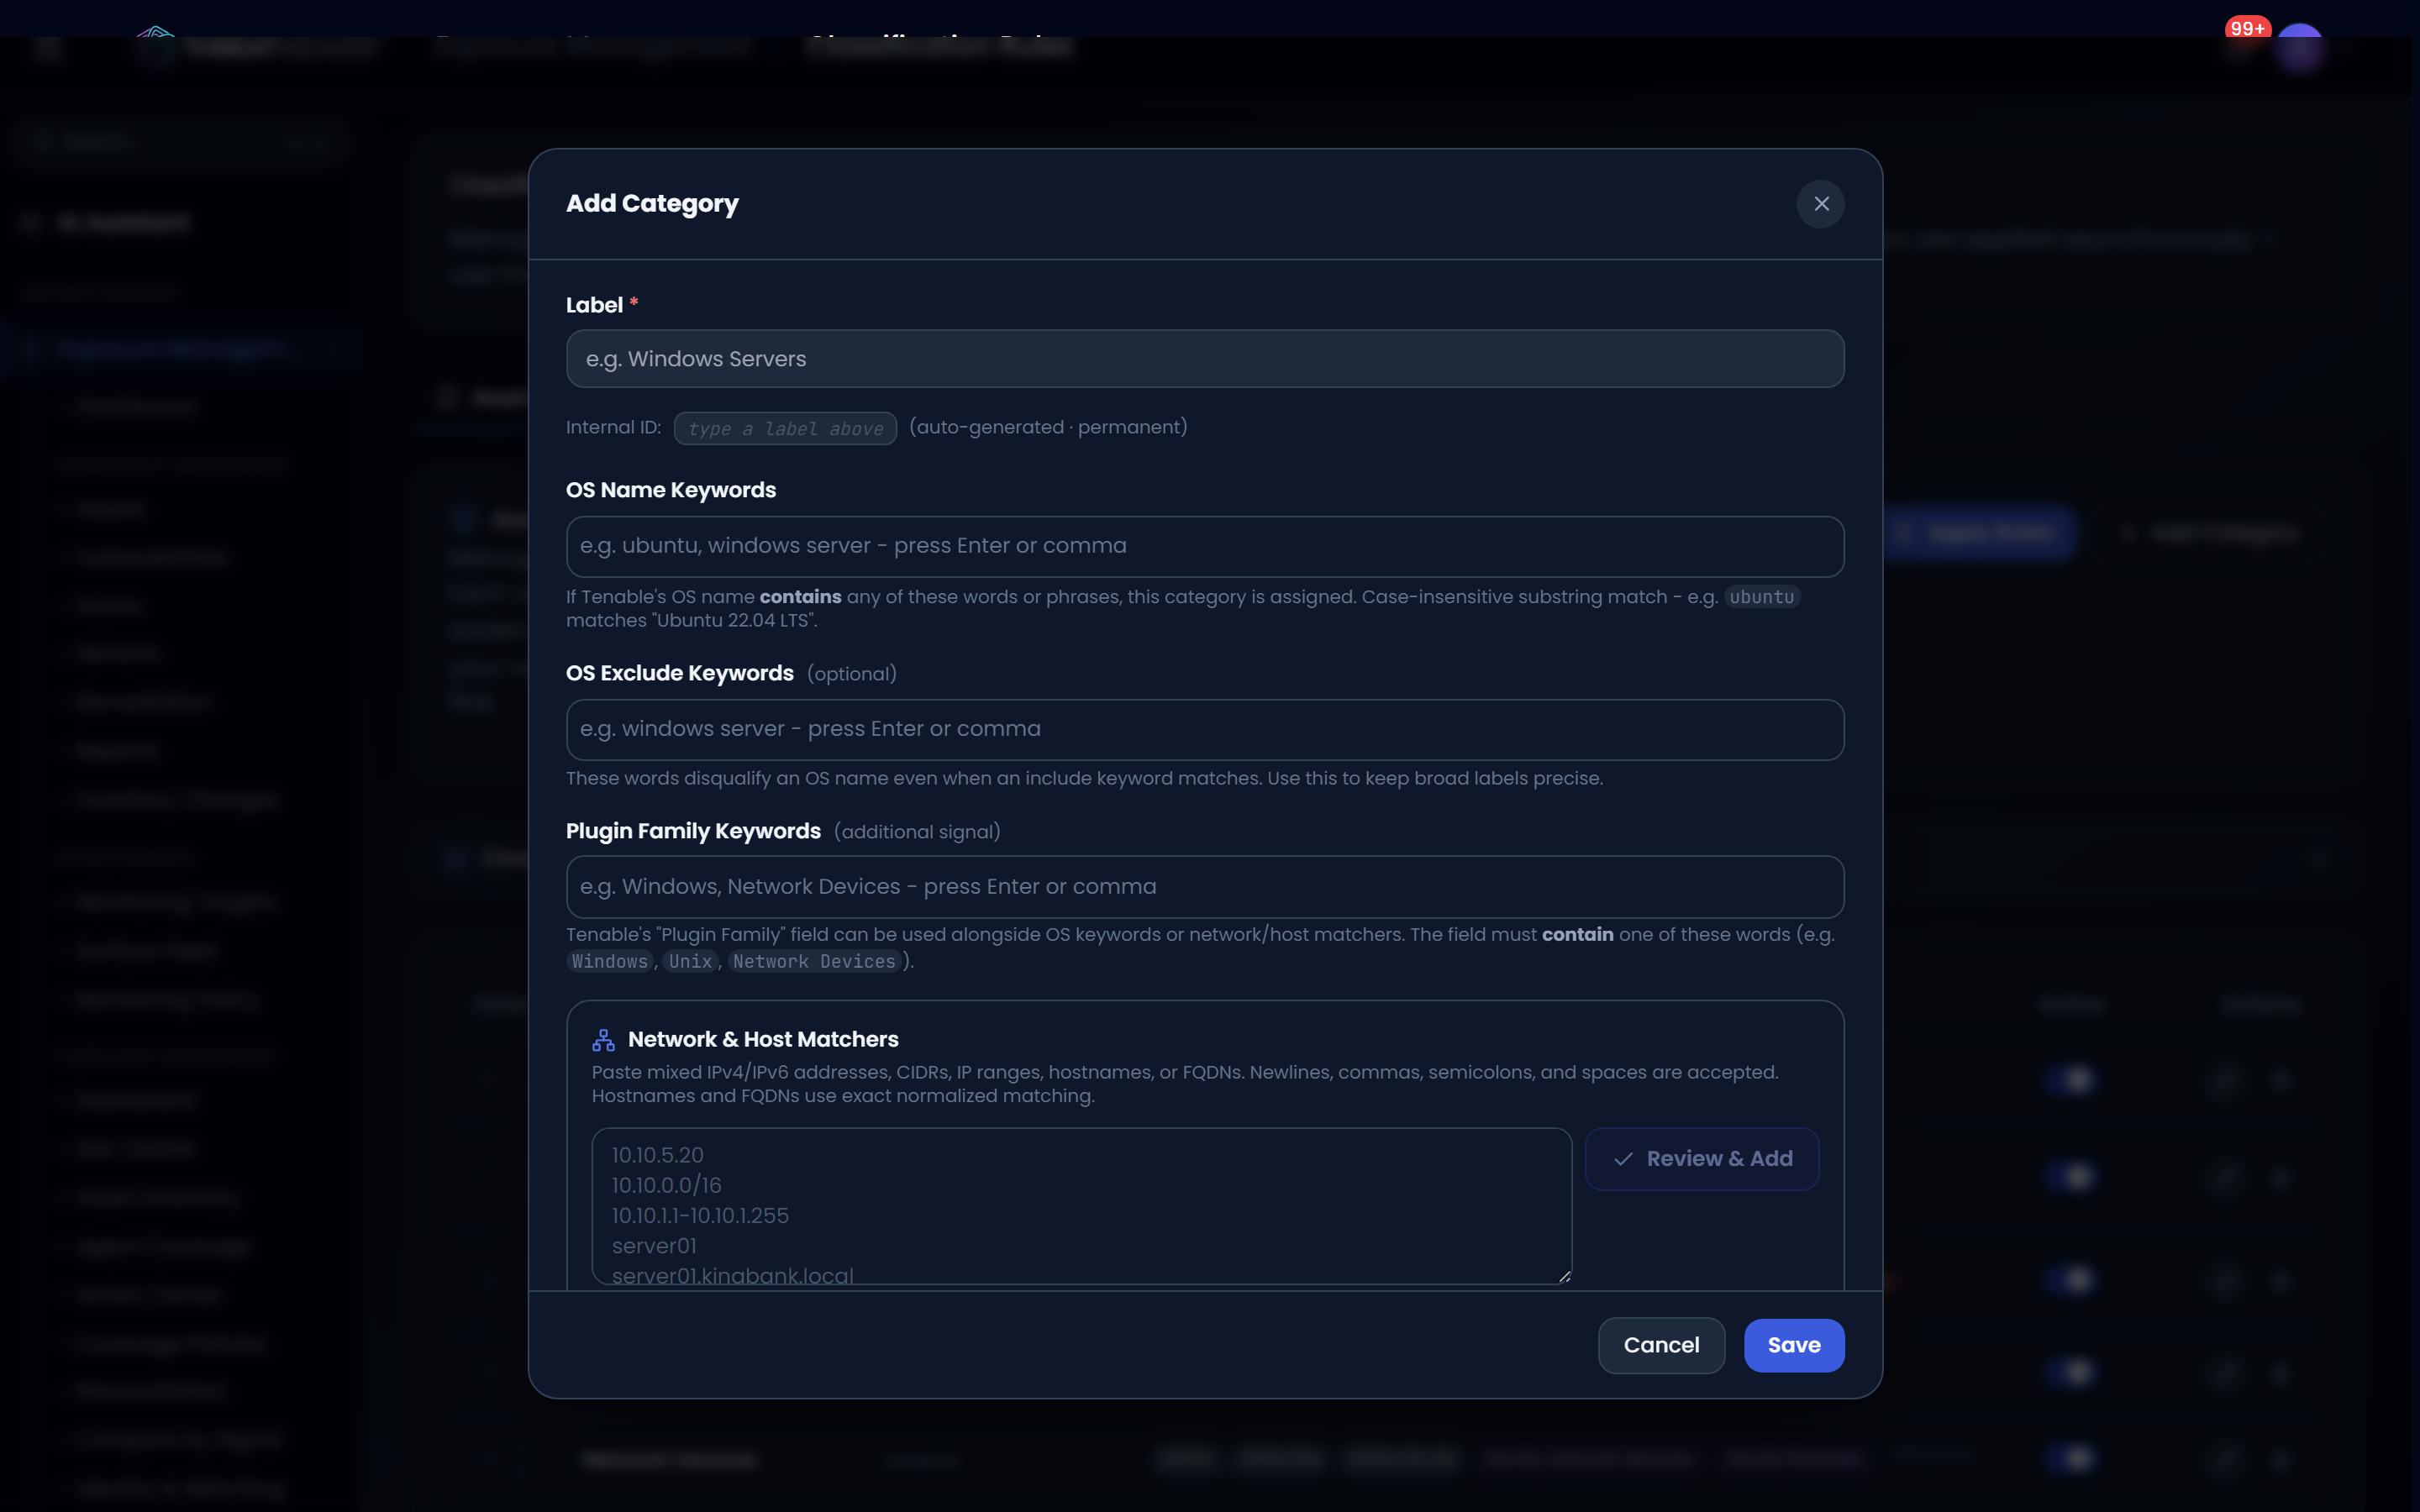
- Enter a Label, then add at least one matching rule: OS keywords, network/host matchers, or advanced conditions. Watch the live match count update as you refine it.
- Choose where the category should appear as a filter (Dashboard, Assets, Vulnerabilities), then save.
- Click Dry Run to confirm the impact, then Apply Rules to update your assets' categories.
Workflow: resolve an unclassified finding
- Open Review Queue and, if needed, filter to Unclassified.
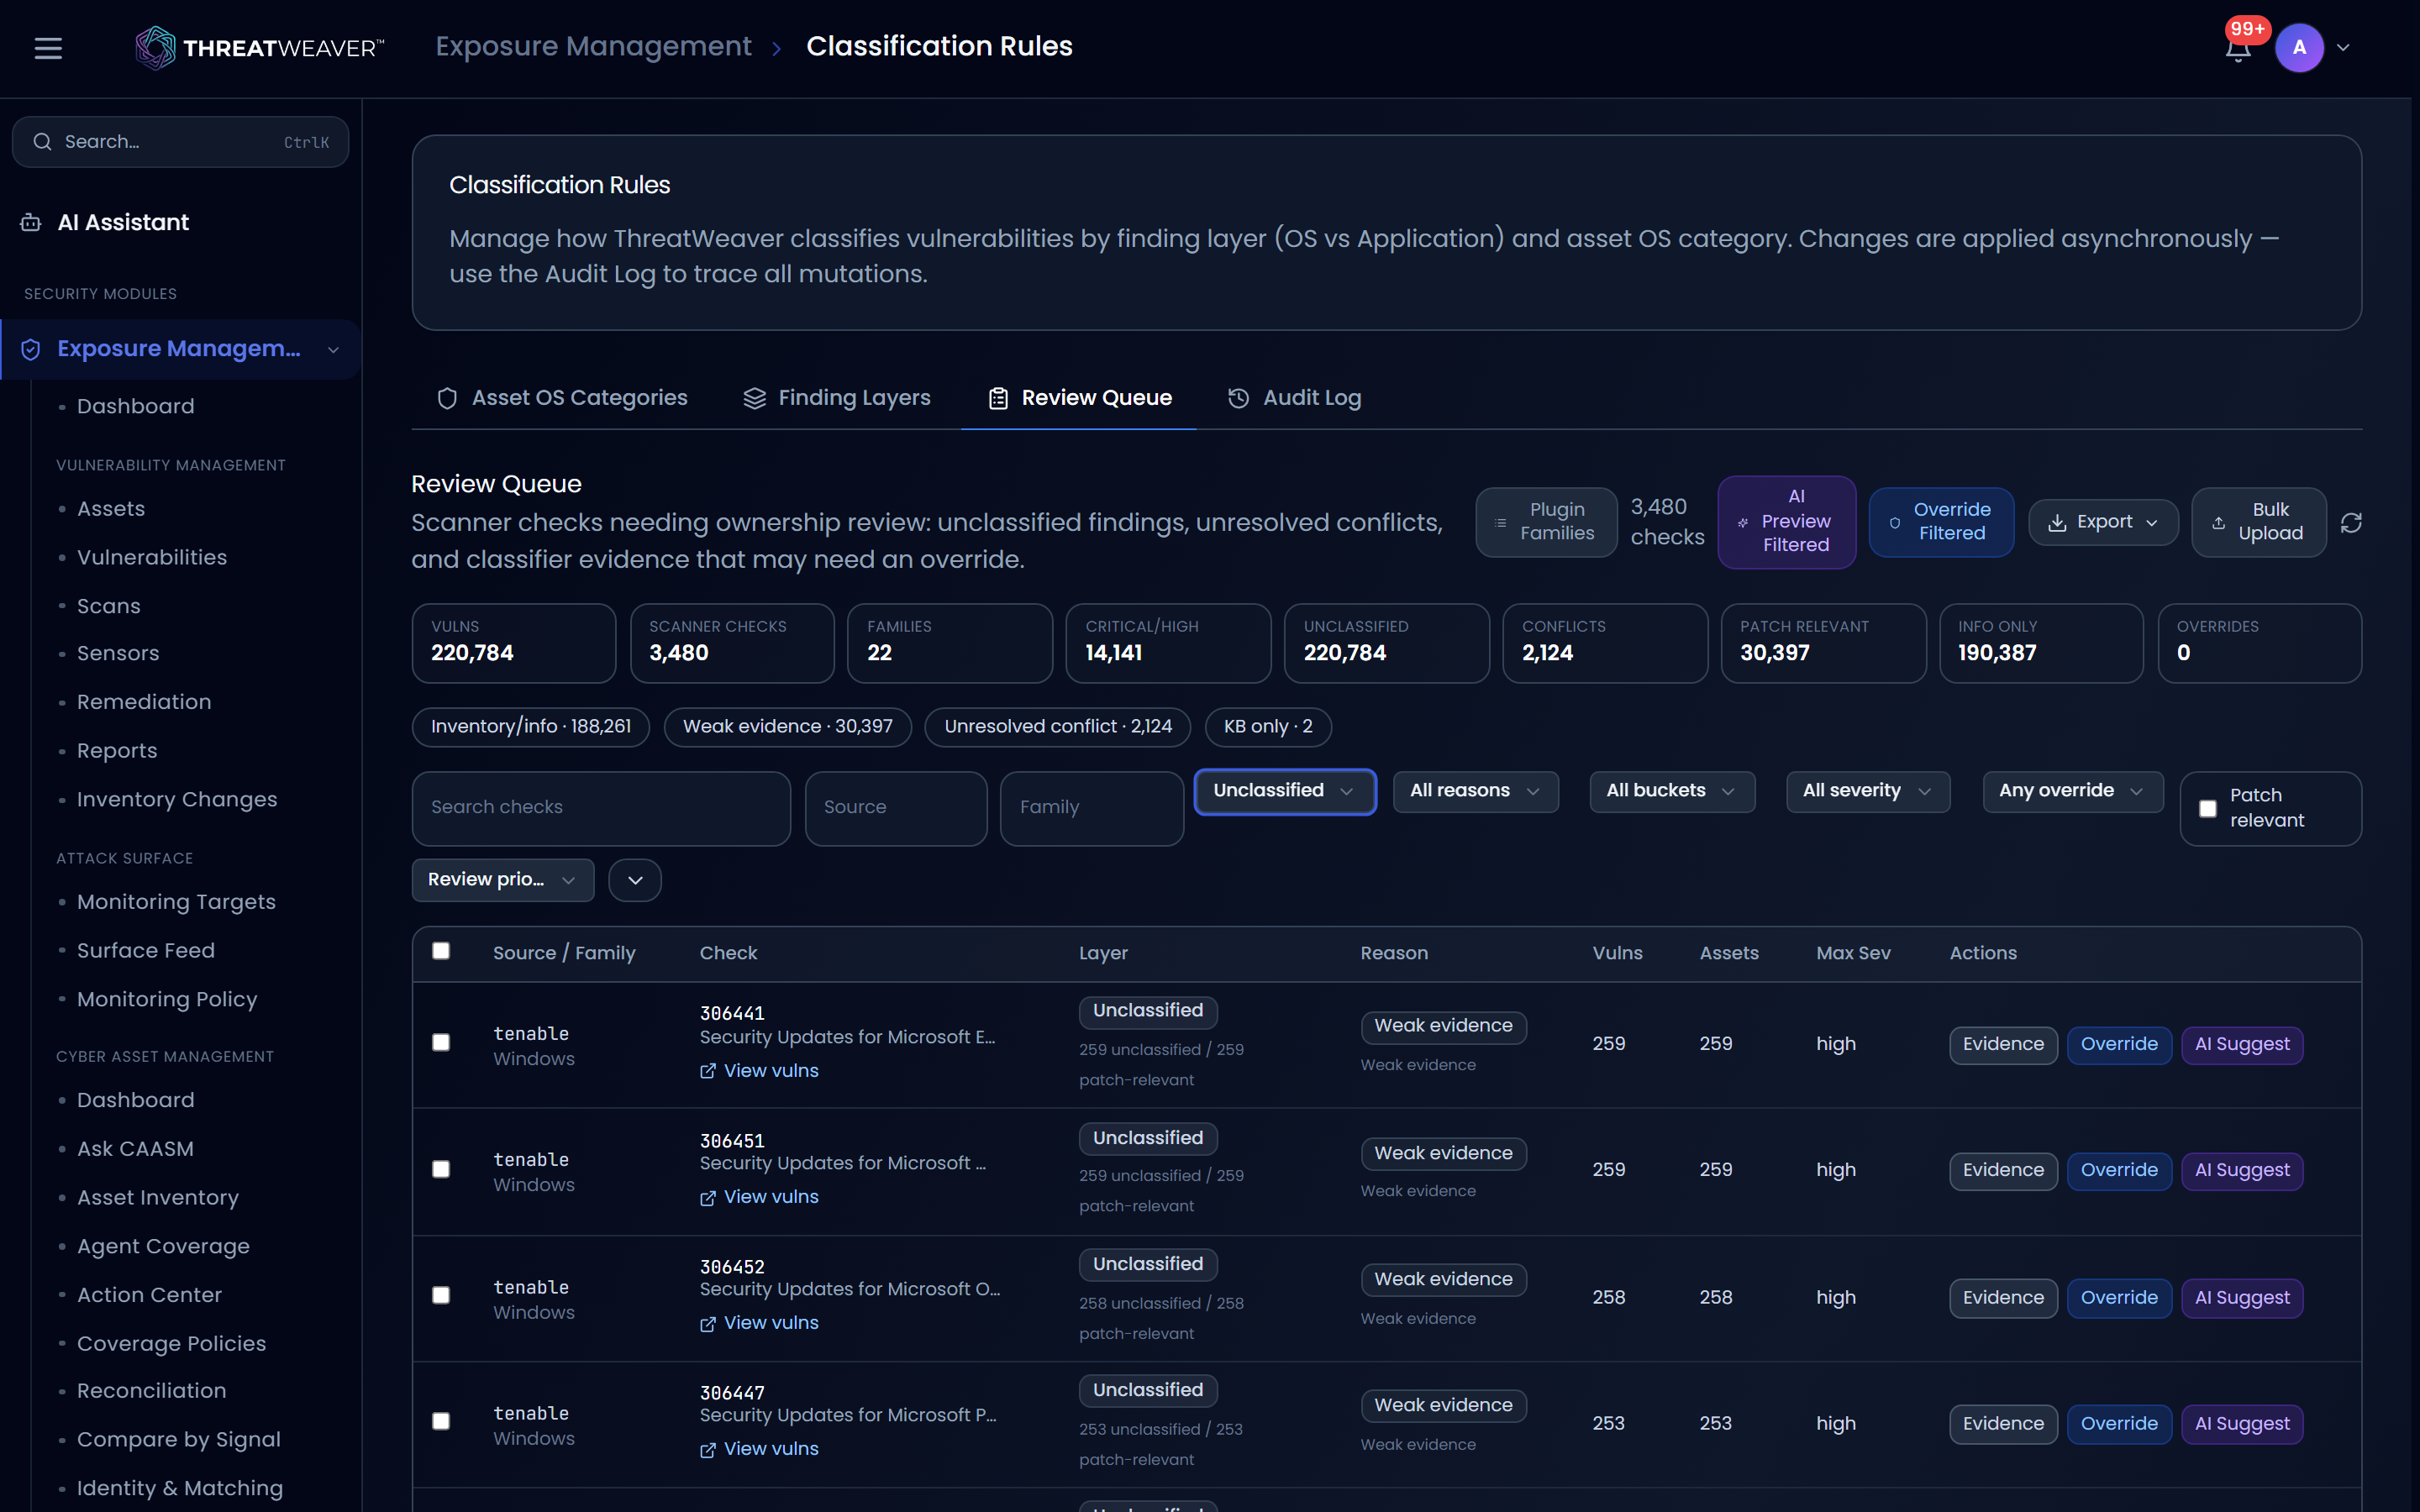
- Click AI Suggest on a check to see a recommended layer and its reasoning.
- Click Apply Suggestion to accept it, or Override to set the layer yourself with your own reason.
- Confirm the check now shows the resolved layer and, if you set an override, an Override badge.