AppSec
Workspace settings
The Settings tab holds the workspace-wide options that shape how future assessments behave, from which AI capabilities are on, to how aggressively a scan crawls a target, to how your CI/CD pipeline triggers scans. Each area below is its own collapsible section on the page.
What it's for
- Control AI behavior: choose where assessment data is processed and which AI-assisted capabilities are turned on.
- Automate scanning: wire assessments into your CI/CD pipeline or GitHub repositories.
- Set defaults for new assessments: rate limits, excluded paths, the browser identity a scan presents, and more.
- Tune sensitive-data detection: the regex patterns that flag credentials, PII, and other sensitive values found during a scan.
- Connect external intelligence sources: API keys for OSINT services used during reconnaissance.
The screens in it
Every section on this page is a collapsible card; click its header to expand or collapse it. Only AI Configuration is expanded by default.
Every control explained
AI Configuration
| Control | What it does |
|---|---|
| AI Residency Mode cards | Choose where assessment data is processed: Cloud (Hybrid) (full AI capabilities, processed via cloud providers), Sensitive/Sanitized (data is redacted, including IPs, domains, and credentials, before cloud processing), or Local Only (all AI processing stays on infrastructure you control, using local models). |
| AI Features toggles | Turn individual AI capabilities on or off: Intelligent Test Planning, Finding Analysis, Exploit Chain Discovery, Report Narrative, Remediation Guidance, and False Positive Detection. |
| Model Selection | Choose which model handles AI tasks: Auto, Claude, GPT-4, or a local model (Ollama, LM Studio). Selecting a local model shows a reminder that it needs to be reachable on your network. |
| Save AI Configuration | Saves your choices for future assessments. |
CI/CD Integration
| Control | What it does |
|---|---|
| Provider | Choose GitHub Actions, GitLab CI, or Generic Webhook; this changes the setup snippet below. |
| Webhook URL | Your workspace's trigger endpoint, with Copy and Test Webhook buttons to confirm it's reachable. |
| Target to Scan | Search and select which registered target the pipeline should scan. |
| Fail on Severity | Choose the minimum severity (Critical and above, High and above, Medium and above) that should fail the pipeline step. |
| Callback URL (optional) | Where your own CI system should receive a notification when the scan finishes. |
| Setup snippet | A ready-to-copy pipeline file for your chosen provider (a GitHub Actions workflow, a GitLab CI job, or a plain curl example), plus a note on where to add your scan token as a pipeline secret. Copy snippet copies it. |
| Test Trigger | Runs an actual trigger against your selected target right now, so you can confirm the integration works before wiring it into your pipeline. |
| Recent Triggers | A running list of past trigger attempts, each with its provider, branch, findings count, and a Passed / Failed / Running / Queued status. |
GitHub integration
Connects a GitHub App for your organization and maps individual repositories to the ThreatWeaver targets they should be scanned as.
Credentials
| Control | What it does |
|---|---|
| GitHub App ID | Your organization's GitHub App identifier. |
| Default Installation ID (optional) | The installation to use when a repository mapping doesn't specify one. |
| Private key | Your GitHub App's private key. Once saved, it can only be rotated (entered again), not viewed. |
| Webhook secret | The shared secret GitHub uses to sign webhook events. Same rotate-only behavior as the private key. |
| Enabled | The master switch for this organization's GitHub integration. |
| Save | Saves the credentials. |
| Test connection | Confirms the saved credentials work against GitHub, and reports the connected app's identity. |
| Remove | Deletes the organization's GitHub configuration, after a confirmation. |
Repository → target mappings
| Control | What it does |
|---|---|
| New mapping | Opens a form to link a GitHub repository to a target: installation, target, owner/repo, a Severity threshold, and whether to Block on threshold (fail the check when that threshold is met). |
| Mappings table | Lists every mapping, with inline-editable Threshold, Block, and Enabled columns, and a delete action per row. |
This screen configures credentials and repository mappings. Confirm current behavior for how scan results are delivered back to a pull request before describing that part of the workflow to a customer.
Default Scan Policy
Settings applied to new assessments by default; you can still override them per-assessment in the wizard.
| Control | What it does |
|---|---|
| Max Concurrent Requests | How many requests a scan can have in flight at once. |
| Requests per Second | The overall request rate cap for a scan. |
| Request Timeout | How long to wait for a single response before giving up on it. |
| Max Scan Duration | The hard time limit for an entire scan. |
| Excluded Path Patterns | Paths to skip during crawling and testing, one pattern per line (for example /admin/*, /logout). |
| User-Agent String | The browser identity a scan presents to the target; pick from common browser presets, Googlebot, or enter a Custom value. |
| Include Scanner Identification Header | When on, requests include a header identifying them as coming from ThreatWeaver, useful for your own log correlation. When off, the scanner doesn't identify itself this way. |
| Follow Redirects | Whether the scanner automatically follows HTTP redirects. |
| Save Scan Policy / Reset to defaults | Saves your changes, or reverts to the built-in defaults. |
Sensitive Data Patterns
Configures the regex patterns used to flag sensitive data (credentials, PII, financial information) found in scan evidence.
| Control | What it does |
|---|---|
| Pattern-Based Detection toggle | The master switch for this pass. When off, your configured patterns are kept but skipped during future assessments. |
| Seed Built-in Patterns / Re-seed Built-in Patterns | Loads (or reloads) the built-in pattern library for credential, PII, financial, and industry-specific detection. |
| Industry Selection | Cards for each industry (Generic, always on; Healthcare, Finance, Telecom, Government, Education, Insurance, Retail). Select the ones relevant to you, then click Apply Industries to enable their pattern sets. |
| Pattern List filters | Narrow the list by Industry, Category, or Status (enabled/disabled). |
| Pattern row | Shows the pattern's name, category, industry, severity, and any compliance framework it's tied to. A built-in badge marks a pattern that shipped with ThreatWeaver, and a system default badge marks one of the fallback patterns scans use if the pattern database is unavailable; disabling a system-default pattern here also disables it in that fallback. Has an enable/disable toggle, a Test icon (loads it into the tester below), and, for your own custom patterns, Edit and Delete. |
| New Pattern | Opens the pattern editor. |
| Live Regex Test | Enter a pattern and flags on the left, sample text to check it against, and click Test Pattern to see the matches on the right. |
Turning off Pattern-Based Detection only skips this regex pass; other scanning agents can still independently surface sensitive-data findings.
Create/edit pattern: fields are Name, Description, Category, Industry, Severity, the Regex Pattern and its flags, an optional Compliance Framework note, and an AI Generate Regex box where you describe what you want to match in plain language and have a regex drafted for you.
OSINT & API Keys
Configures API keys for external intelligence services used during scans: Shodan, GitHub, VirusTotal, HaveIBeenPwned, SecurityTrails, and Censys.
| Control | What it does |
|---|---|
| API key field | Enter the service's API key; the eye icon shows or hides it as you type. |
| Save Key | Stores the key. |
| Test Connection | Validates the key against the service and shows whether it worked, plus when it was last checked. |
| Enable/disable toggle | Turns a saved key on or off without deleting it. |
| Get Key | Opens the provider's signup page in a new tab, when available. |
| Status badge | Active, Available, Env Variable (configured outside this screen), Disabled, or No Key. |
Services that don't require a key still work without one, at a lower rate limit; adding a key raises the limit.
Security & Evidence
| Control | What it does |
|---|---|
| Evidence Redaction toggle | When on, sensitive values (tokens, passwords, API keys) captured in finding evidence are masked before storage. When off (the default), full evidence is kept so you can replay and verify a finding. Applies to future scans only. |
| Save Security Settings | Saves the setting. |
Investigator Brain
A tenant-wide default for how thoroughly new assessments investigate what they find.
| Control | What it does |
|---|---|
| Enable investigator brain by default toggle | Turns on a more thorough, multi-step investigation mode for newly created assessments. Existing assessments aren't affected. |
| Capability chips | Always shown, summarizing what the deeper mode adds when turned on: building a picture of the target, forming and testing hypotheses about possible issues, planning next steps, coordinating findings across techniques, weighing conflicting evidence, correlating results across scan modes, and keeping a trace of what it investigated and why. |
| Save Investigator Default | Saves the setting. |
Phase 0: Pre-Scan Intelligence
Timeouts and interaction settings for the reconnaissance step that runs before the main scan.
| Control | What it does |
|---|---|
| Phase 0 Review Gate Timeout | How long to wait before automatically proceeding past the pre-scan review step. Set to Off to require manual approval every time. |
| Interactive Question Timeout | How long to wait for an answer when Phase 0 asks a clarifying question. Set to Forever to wait indefinitely. |
| Phase 0 Maximum Duration | A hard cap on how long the whole Phase 0 step can run. Set to No limit to remove the cap. |
| Enable Voice Input | Lets you answer Phase 0 questions using your browser's microphone (requires HTTPS). |
| Save Phase 0 Settings | Saves your changes. |
Server Administration
Live status for the scan engine serving your workspace, and the thresholds that control when it throttles or blocks new scans.
| Control | What it does |
|---|---|
| Live Server Health | A status badge (Healthy / Degraded / Critical) plus current CPU Usage, Memory Usage, Heap Memory, and Active Scans readings, refreshed automatically while this section is open. |
| Max Concurrent Scans | The most scans allowed to run at the same time. |
| Global Max Requests/sec | The overall request-rate cap across all scans. |
| CPU / Memory Degraded and Critical thresholds | The usage percentages at which the server starts adding delays (Degraded) or blocks new scans entirely (Critical). |
| Save Thresholds | Saves your changes. |
Common workflows
Workflow: turn on stricter sensitive-data detection for your industry
- Open Settings and expand Sensitive Data Patterns.
- If you haven't yet, click Seed Built-in Patterns.
- Under Industry Selection, select the industries that apply to you (for example Healthcare and Finance) and click Apply Industries.
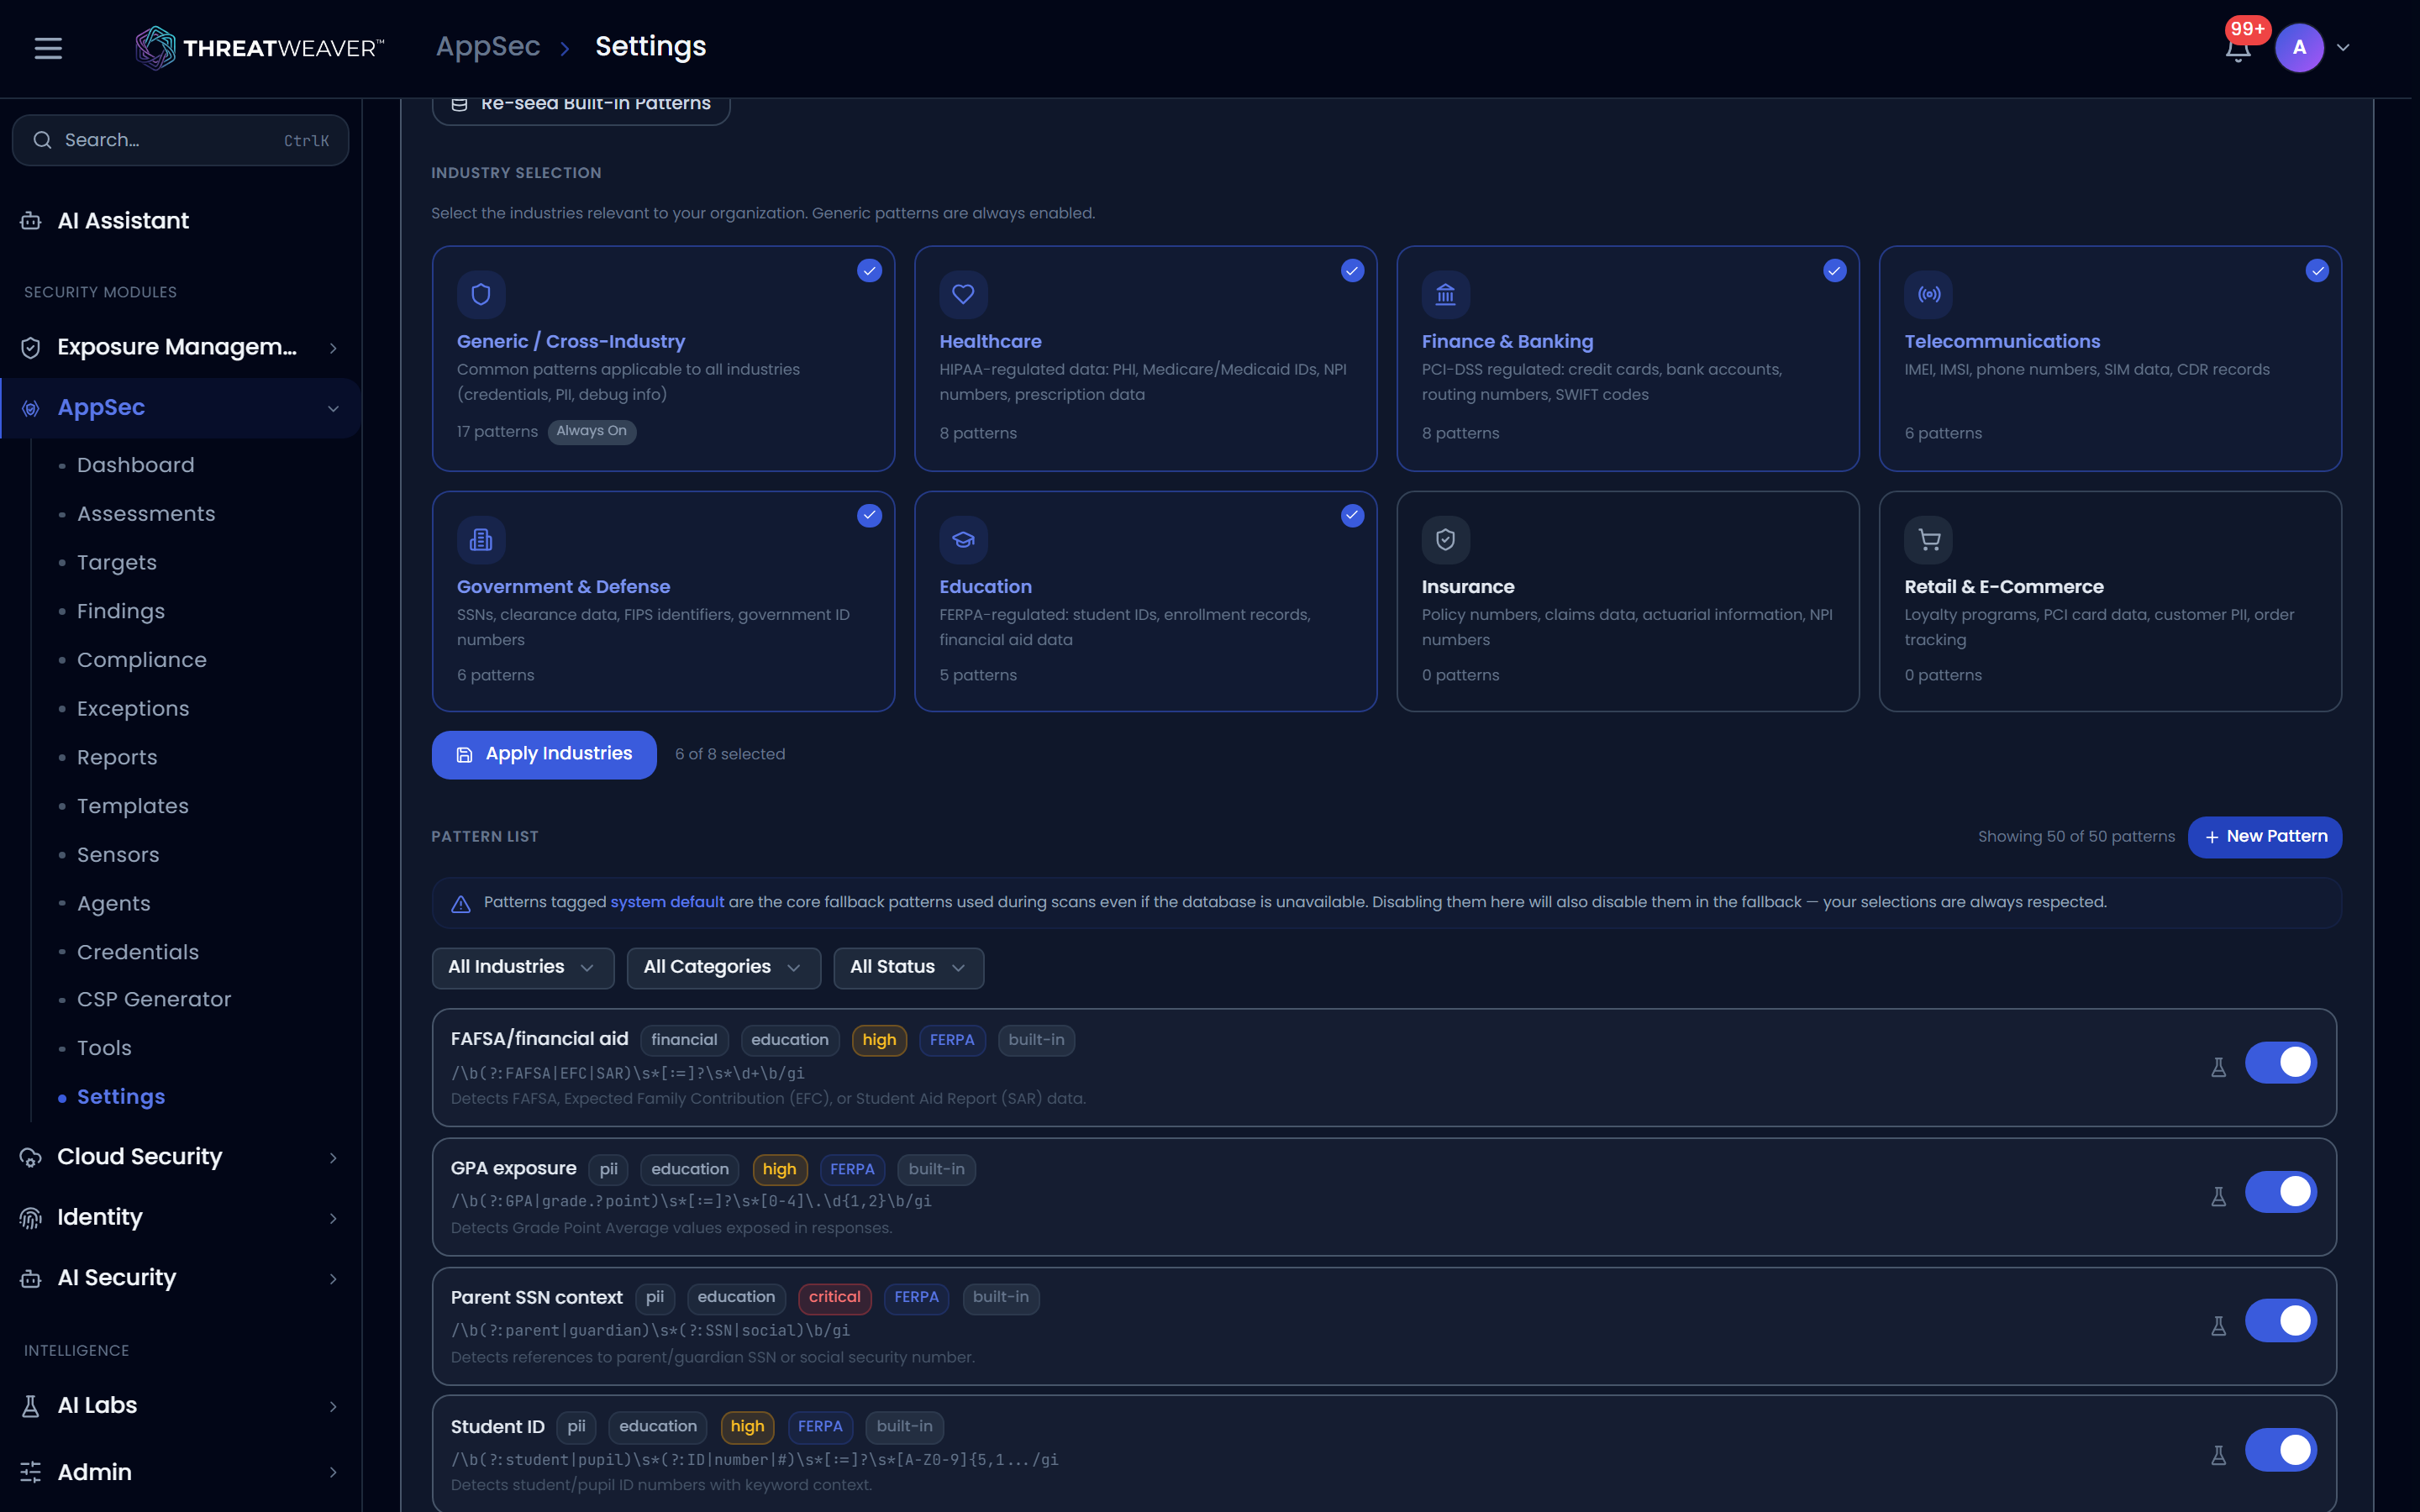
- Use the Pattern List filters to review what's enabled, and toggle any individual pattern on or off as needed.
Workflow: connect an OSINT service
- Open Settings and expand OSINT & API Keys.
- Find the service you want to connect and paste its API key into the field.
- Click Test Connection to confirm it works.
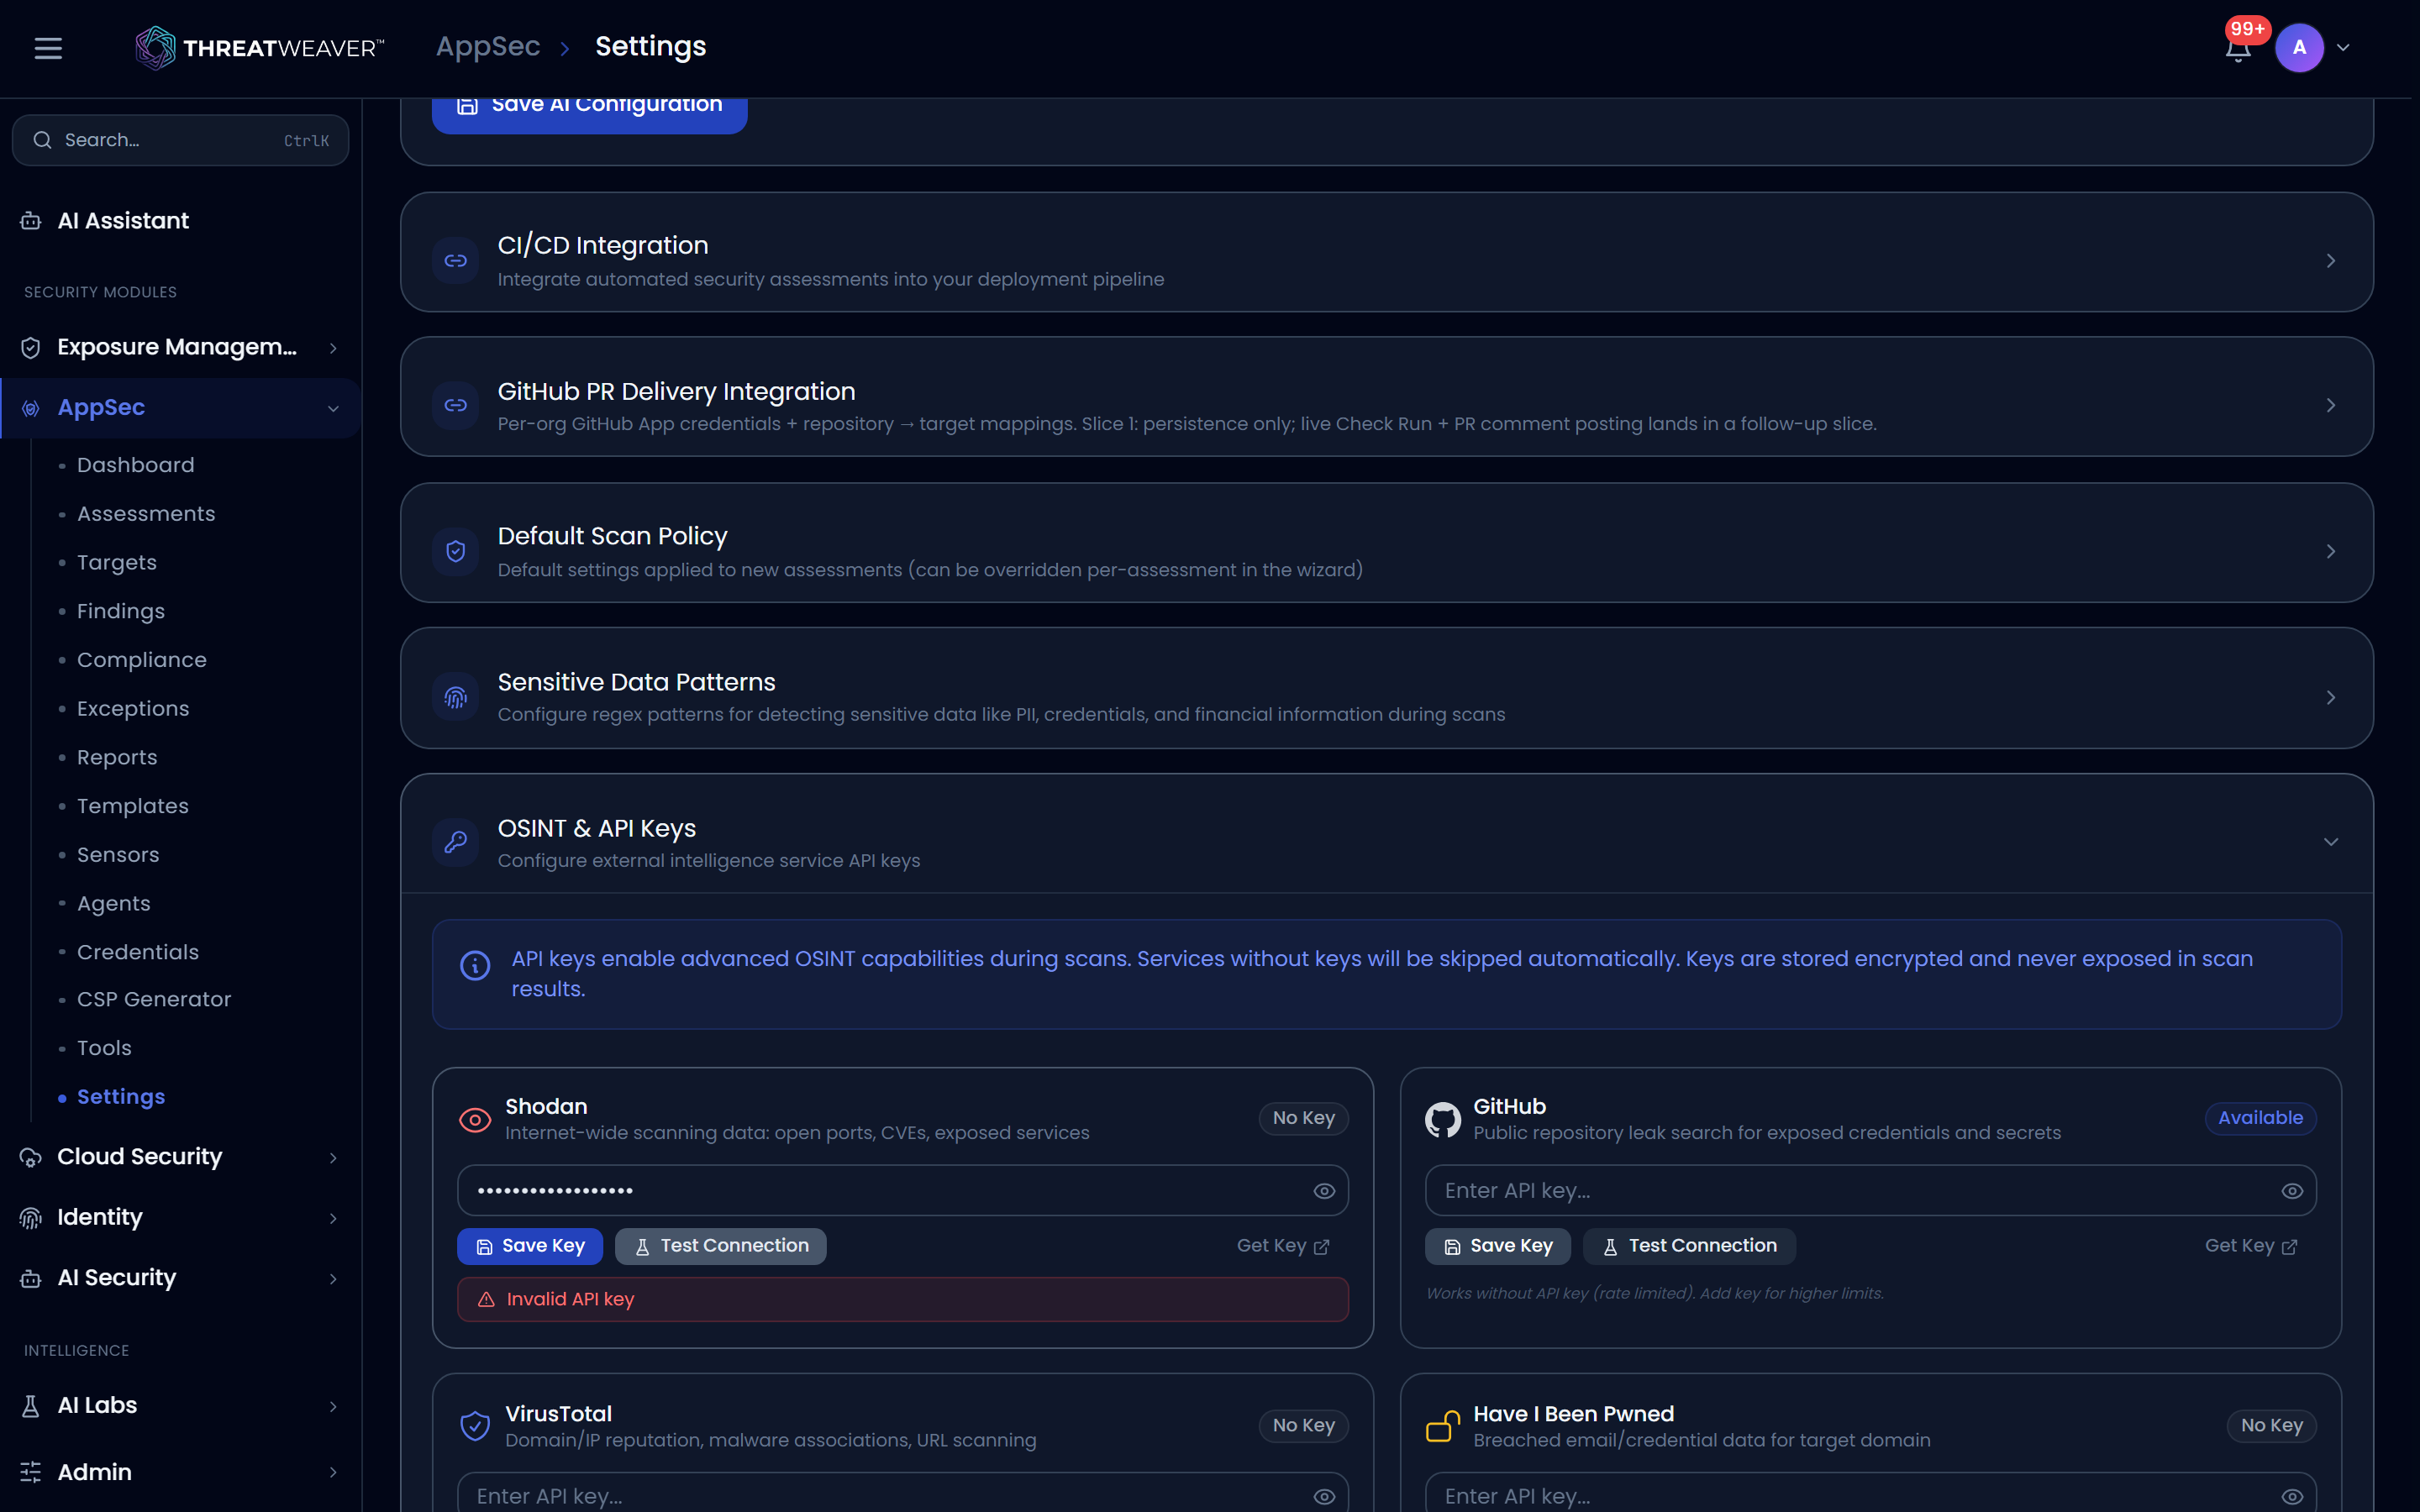
- Click Save Key. The service's status badge changes to Active.
Workflow: wire a target into your CI/CD pipeline
- Open Settings and expand CI/CD Integration.
- Choose your Provider, then select the Target to Scan and a Fail on Severity threshold.
- Copy the Setup snippet into your pipeline configuration, and add your scan token as a pipeline secret as noted beneath the snippet.
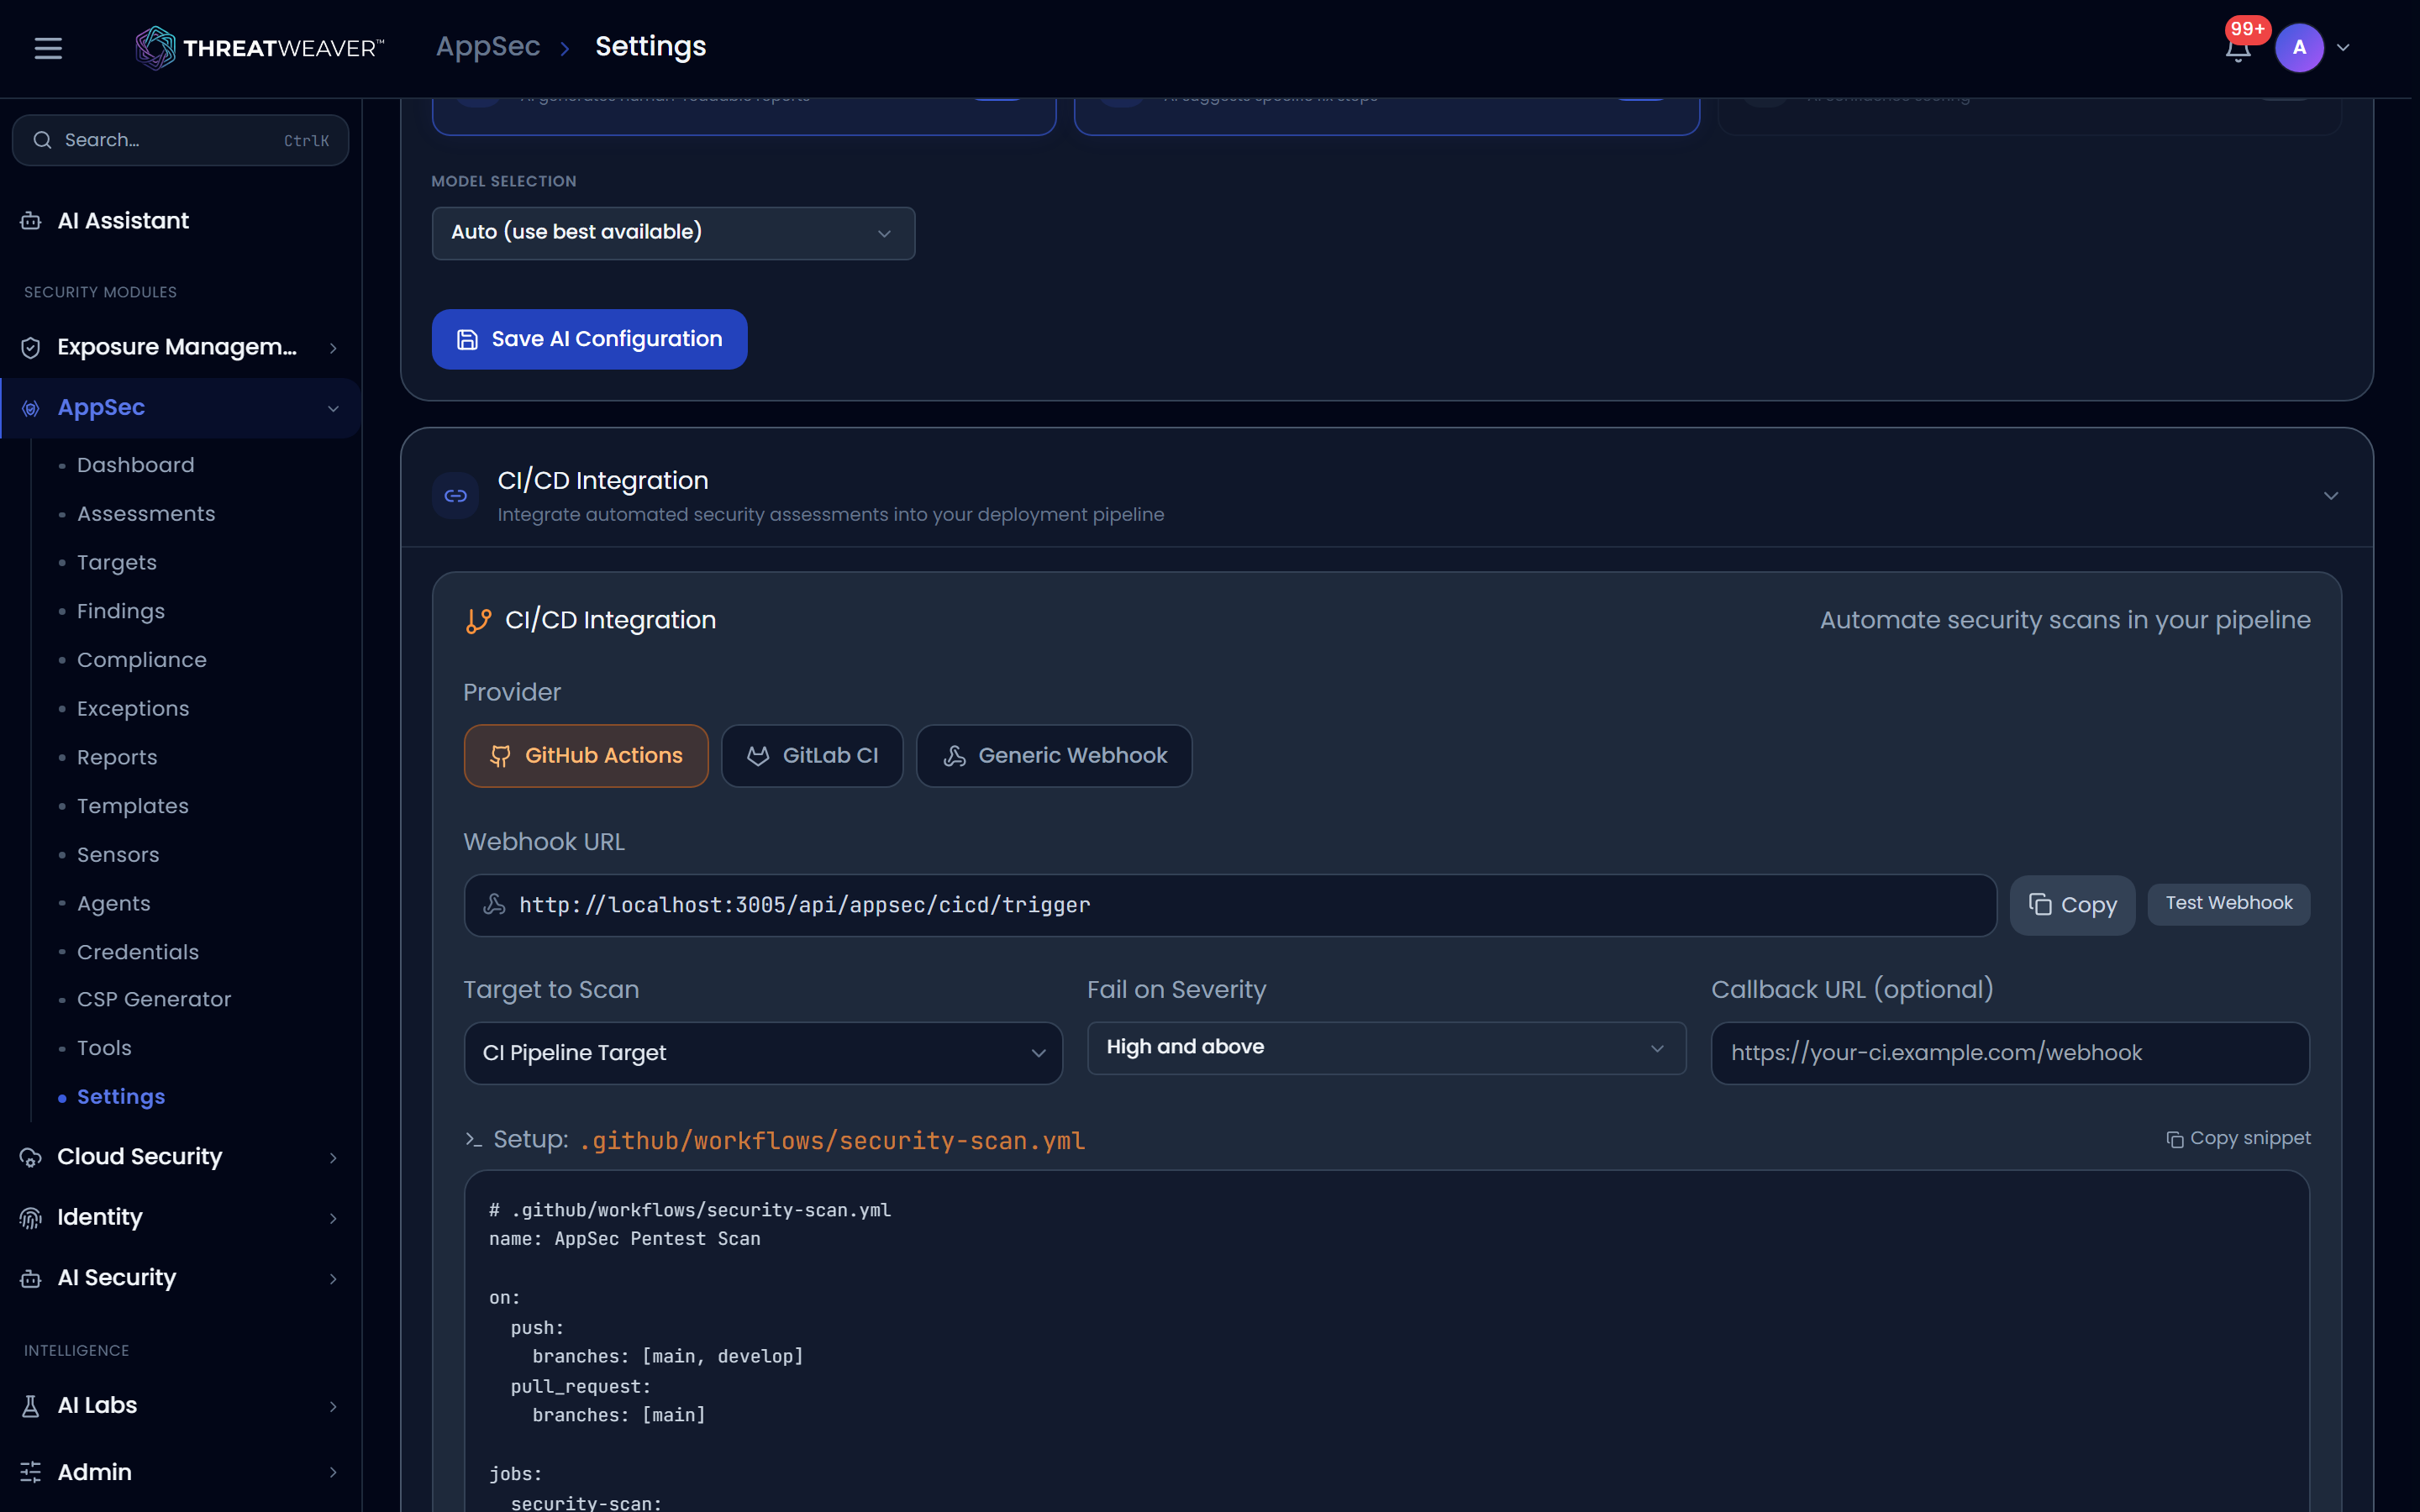
- Click Test Trigger to confirm the integration works before relying on it in your pipeline.